


If you are installing a projector system or designing an AV system for a bedroom set-up, you must have come across different questions. These questions would include how much a home cinema costs or how to set up a projector in the bedroom.
While setting up the projector, you’d have to carefully plan the set-up, measure the throw distance, mount the projector, and more. Doing so will help you avoid issues ranging from limited space and throw distance to ambient lighting and mounting.
On the other hand, skipping these steps can lead to image distortion, lower picture quality, and improper projector placement. It doesn’t seem pleasant. Right?
Therefore, AV integrators and designers often look for a guide that can help them avoid such issues. It helps them successfully set up the best projector for the bedroom.
Hence, we bring you a comprehensive step-by-step guide on how to set up a projector in a bedroom. It helps guide successfully through AV projector installation. Keep reading to learn more.
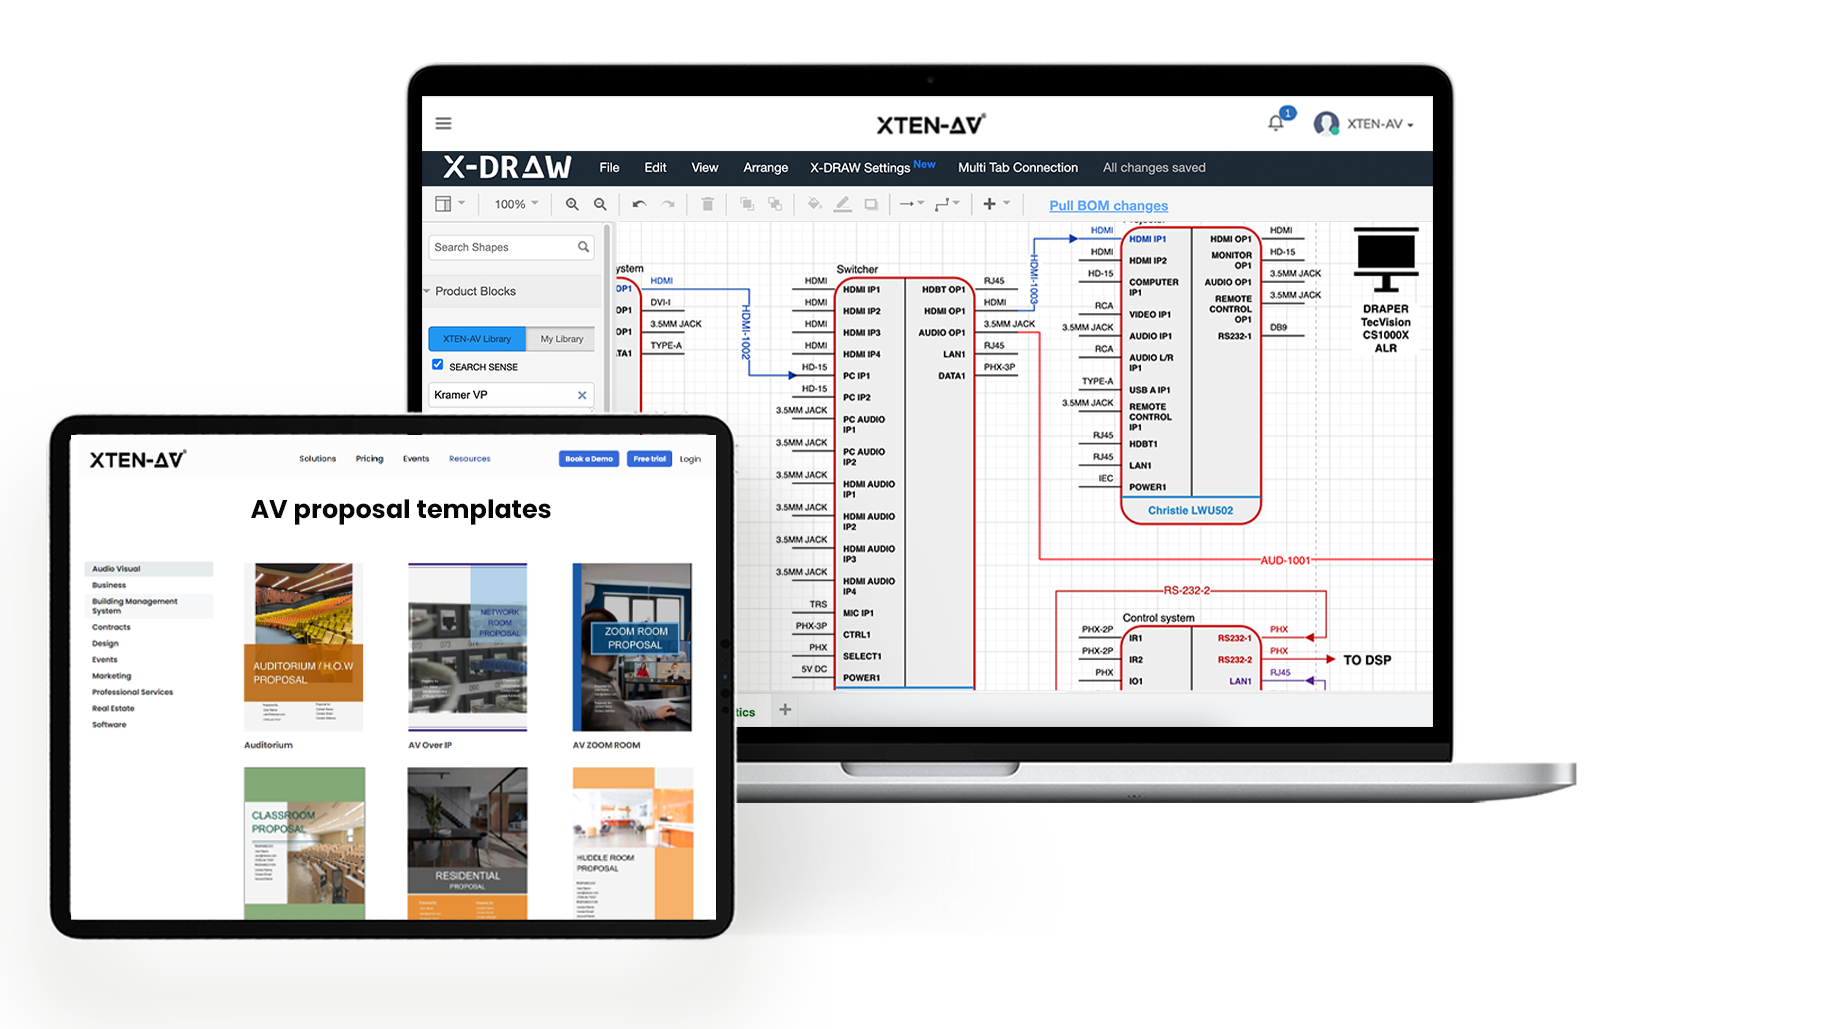
The all-in-one solution for your AV needs
Transform your audio-visual experience with XTEN-AV.
No Credit Card required
Step 1. Planning the Bedroom Projector Setup
As an AV professional, you would know that proper planning of bedroom projector installation prevents issues such as image quality, light levels, and sound degradation. Careful planning of bedroom projector installation guarantees timely project delivery, minimal error, and happy customers.
You’d need to determine different aspects like room size & layout, projection surface, and more for successful planning. While XTEN-AV can help you determine these aspects easily, here’s a breakdown of all the aspects for better understanding.
Room size & layout
Considering room size & layout helps you determine the type of components to use and where to place them. It ensures that your room maintains its aesthetics. Room size & layout determine if you’d have to install a long-throw or a short-throw projector.
It also directly influences the projector throw distance, lens shift, and keystone correction. Therefore, thorough planning ensures that the client gets a picture-perfect audio-visual experience.
You’d have to measure the room dimensions manually. However, you don’t have to calculate the Projection Throw Distance and Screen Image Size manually. XTEN-AV can help you use these dimensions to calculate Projection Throw Distance and Screen Image Size.
These features will help you make calculations faster. As a result, you can accurately install a projector system. They will help you ensure that the client has maximum comfort, clarity, and immersion with their system.
Projection surface
Choosing a projection surface is not limited to display quality. The right projector TV for the bedroom ensures high-quality image projection while adapting to the bedroom’s lighting environment. But how can AV professionals determine if the projection surface is right for the projector bedroom set-up?
To determine that the projection surface is perfect for the set-up, you’d need to know about the screen gain and viewing angle. A screen with a gain of 1.0 is industry standard, ensures optimal reflection, and is perfect for standard set-ups.
However, a screen with a gain of 1.2 will be a better fit if there is more lighting in the room, as the screen reflects the image 20% more. Some of the most common and favorite projector screens for bedrooms with surface types and suitable environments are:
- Standard matte white finish with a 1.0 gain – perfect for dark bedrooms with central sitting.
- High Contrast gray surface with a gain. ranging from 0.7 – 1.1 – a better fit for a room with low lighting.
- High contrast white surface with gain ranging from 1.1 – 1.5 – perfect for moderate lighting.
- High gain screen without high contrast ranging from 1.3 – 2.0 – suitable for a room with a high lighting level.
Lighting control
Lighting control in the bedroom will control ambient lighting and avoid strain during long-time viewing to the client. It will also help you avoid issues like washed-out images, screen glare and reflection, and eye strain.
These issues lead to an uncomfortable viewing experience after successful set-up/installation. However, you can resolve such issues by careful planning and installing ambient light-rejecting (ALR) screens.
You can install LED bulbs and lights with adjustable lighting. You can also divide the room into different zones with different lighting. As a result, having controlled lighting in the bedroom will provide you, an AV professional, with a detailed and immersive viewing experience.
XTEN-AV helps you select the projector screen of your choice from its extensive library. The library comprises more than 1.5 million products. These products can help you select different lighting for different room sections. As a result, you can set up a system that works perfectly for the first time.
Seating Arrangement
Another key consideration in planning the bedroom projector setup is seating. As a professional in AV, you’d organize a seating arrangement that includes an optimal viewing distance & angle.
It prevents the room from being disorganized and the client from experiencing maximum discomfort for long-term viewing. Additionally, an optimal seating arrangement prevents problems such as audio ambiguity.
You can plan the theater seats at an optimal distance of around 1.5 to 2.5 times the screen size for comfortable viewing. However, there are multiple aspects that you need to figure out.
These factors determine the seating layout based on viewing angles and room space. They also determine if the client can see the image comfortably with an immersive audio-visual experience.
This is where XTEN-AV comes in. With floor plans and system design, you can get the perfect seating layout for the client.
Step 2. Measuring Throw Distance & Screen Size
Measuring the throw distance & screen is the next step after planning the bedroom projector set-up. Being an AV professional, you’d know that it determines the ideal image size.
Measuring the throw distance & screen size also prevents issues like blurry images or cropped projected visuals. It also prevents misalignment and modification and improves the immersive viewing experience.
But how can you calculate the throw distance and screen size without putting too much effort, and what do they depend on?
You can calculate the throw distance using the formula: Throw Distance = Throw Ratio * Image Width.
Try XTEN-AV’s projector throw calculator if you need a tool to calculate throw distance & screen size. All you need to do is enter the projector’s throw ratio, aspect ratio, and the desired image size. Once you enter the details, XTEN-AV will calculate the throw distance and screen size for you.

Step 3. Mounting the Projector
The third significant step in how to install a projector in a bedroom is mounting the projector. You, being an AV specialist, know very well that mounting a projector provides the best throw distance. Thus, you can have clear and high-definition images with no keystone correction without spending money on a 4k projector.
Mounting the projector provides an immersive viewing experience and blends in the bedroom easily without crowding the bedroom. However, mounting the projector in the bedroom comes with its own set of challenges.
During the installation, you might have to deal with the low or sloped ceiling and space constraints for optimal mounting. Moreover, mounting the projector has aesthetic limitations along with issues such as overheating, image distortion, and power & speaker integration.
XTEN-AV helps you resolve these challenges by suggesting ideal placement locations according to room dimensions and layout. It also recommends ideal projector models and compatible projector screens, cables, speakers, and easy-to-understand cable diagrams.
But how will you decide on projector placement? To do so, you’ll need to understand the different types of mountings/projector placement.
Ceiling Mount
A ceiling mount is a permanent set-up, but it saves a lot of floor space. You can use a specialized bracket or mount to secure the projector in such an installation. Additionally, it allows you to ensure that end users experience obstruction-free projection on the screen or wall.
Shelf Placement
You can place the projector on a sturdy and flat shelf with a strong base and ample space to adjust for optimal viewing. You can further secure the installation by securely attaching the shelf to the wall.
Although these placements are cost-effective, they come with cons. A shelf placement is unsuitable for heavy projectors, and it makes the set-up stand out from the decor. It also results in lower image quality and maintenance issues.
Hidden Installation
Hidden installation while mounting the projector hides the projector inside the ceiling or wall. You can use a projector lift or a modified enclosure in this installation. It provides a seamless and modernistic look to the end users’ bedroom projector set-up.
Now, you have mounted the projector as per the available space, along with room size and dimensions. Here is the next step, which is connecting power & cables.
Step 4. Connecting Power & Cables
Connecting power & cables allows the AV integrators to deliver a high-quality system. These cables connect the projector system to power, video, and audio. You can also use wireless components like Wi-Fi or Bluetooth for a cleaner set-up.
Such a system offers smooth performance and ensures seamless data transmission & integration from source devices. It also ensures that the bedroom space is clean and aesthetic.
Installing a well-connected projector system with power & cable prevents a variety of issues. These issues include loose connections or power overloading, signal degradation, and video latency.
A well-connected projector system also avoids incompatibility between the components and remodels the cable set-up. But how can you ensure that your AV projector system eliminates any incompatibility issues?
This is where XTEN-AV comes in. XTEN-AV offers automated cable connection in system designs and creates wiring and connection diagrams. With that covered, let’s understand the different types of connections used in the projector bedroom set-up.
Power Connection:
To connect the projector to power, you have to follow the below steps:
- Find the power outlet: Locate the projector’s designated power inlet, often a conventional 3-prong plug.
- Attach the power cord: Make sure you have securely plugged the power cord into the projector’s power inlet.
- Connect to an outlet: Connect the power cord’s other end to a grounded electrical outlet.
- Check the power: The projector should have a light or indicator to show whether it is consuming power or in use.
Additionally, you can use a surge protector or voltage stabilizer to safeguard your device from unwanted power surges.
HDMI Set-up:
Connecting the HDMI cables to the projector is another crucial step of connecting cables with the projector. The HDMI cable provides high-quality video and audio from the media source. This source can vary from device to device, such as a laptop, streaming device, and gaming console.
You must always prefer a high-speed HDMI cable for better results. Additionally, if your projector has multiple HDMI ports, the port with the highest resolution is the most preferred one.
Wireless Options:
Wireless HDMI transmitters, like a USB dongle, and receivers also provide high-quality video and audio transmission. Additionally, some projectors offer built-in wireless connectivity, such as Wi-Fi or Bluetooth. It can create a cleaner set-up, helping you manage multiple cables seamlessly.
Step 5. Turning On & Adjusting the Projector
After connecting power and cables, the next step comprises turning on & adjusting the projector. This step may seem an easy step for the end users. But it involves navigating the sea of technical, integrational, and operational issues.
When turning on the projector, you may experience intermittent power loss or insufficient power to the projector. You can also experience compatibility issues with the projector components and issues related to signal detection.
On the other hand, you may experience a wide array of issues. Image misalignment keystone correction and insufficient throw distance lead to issues with image size. On the other hand, some of you may witness blurry images because of focus issues.
You may also experience washed-out images and screen glare because of excessive brightness settings or ambient lighting. In addition, you can experience compatibility issues with receivers, speakers, and power sources.
However, diagrammatic tools such as XTEN-AV have automated throw distance and brightness calculators. These automated calculators can help you resolve these issues. They also offer error-free mapping to minimize trial and error while installing the projector.
XTEN-AV also offers submittals, which are sheets that contain all product specifications. The sheet ensures that AV components are compatible with each other.
We have covered the challenges of turning on & adjusting the projector. So, let’s move on to the steps required to do the same and learn more about each of them in detail.
Powering Up:
Use the power button available on the projector to turn it on, or use the remote control. The projection surface will show the startup screen once you turn on the projector.
Lens Adjustment:
Once the projector is turned on, adjust its lens to focus the image on the screen and sharpen it. Most projectors have a focus ring around the lens to serve this purpose.
You should turn this ring until the image’s sharpness and clarity are as per the end user’s desire. Lens adjustment ensures an immersive viewing experience. On the other hand, some projectors offer remote focus adjustment.
Pro Tip: Always ensure the image’s edges and center are equally focused while adjusting the lens.
Zoom & Keystone Correction:
The zoom function allows you to ensure the image fits perfectly on the projector screen. You can also adjust the image to suit the client’s viewing needs. You can use the keystone correction feature to modify a distorted image digitally.
You can even change the image into a focused rectangular shape. Many AV professionals and integrators use this feature when the projector is misaligned with the screen.
Step 6. Setting Up Audio for a True Home Theater Experience
Setting up the speaker system for the projector in a bedroom may seem simple and easy to do, but it is not. While installing the speaker system, AV professionals may have to tackle space constraint issues in bedrooms. These issues arise because of unusual layouts or small dimensions.
AV integrators may also have to experience other issues while setting up audio for an immersive experience. These issues can range from room acoustics, speaker calibration & room eq to sound bleeding into other rooms. In addition, such issues pose various impacts on the projector set-up, such as:
- Difficulty in maintaining optimal distance and angles between the speakers
- Sound distortion or unclear sounds
- Inconsistent audio on all seats
- Sound is bleeding to other rooms, disturbing other occupants/residents.
In such scenarios, XTEN-AV automatically lends a helping hand to the AV designers by providing
- Tools that offer automated design, suggesting ideal placement location for the speaker system
- Solutions to resolve acoustic issues
- And recommendations on the type of speaker to use as per the available space and performance
But what speaker devices can you use for the immersive audio experience? Here’s the list with information about each of them in detail:
Built-in Speakers:
Most modern projectors have built-in speakers. They are easy to set up, compact, and highly affordable. However, they lack audio depth, surround sound, and customization features and have low audio output. However, these projectors are perfect for small rooms, business or classroom settings, outdoor movie nights, and traveling.
Soundbar or External Speakers:
Connecting a soundbar to the projector exponentially improves the viewing experience. It ensures seamless audio integration, allowing the end user to enjoy an immersive viewing experience. In current times, different connectivity options exist with speakers like Bluetooth connectivity, HDMI ARC, or AUX.
Surround Sound System:
As an AV integrator, an immersive experience is critical for the end users. This is where the surround sound system comes in. The surround sound system uses multiple audio sources from the speaker as they enhance the sound’s depth and fidelity.
These speakers replicate the sound around the listener, especially to his rear and side. One of the prime examples of a surround sound system is Dolby Atmos.
We have covered all the aspects related to the sound system and its seamless installation into the projector system. So, here’s a breakdown of cable management for a clean projector set-up in the bedroom.
Step 7. Cable Management for a Clean Set-up
A clean and aesthetically pleasing set-up is a must when setting up the projector system for a client. It allows enough space to move freely in the room.
Although a clean set-up is necessary, what challenges does this pose for AV designers and consultants? Here’s a breakdown of the challenges that a cluttered set-up poses:
- Cluttered space and unpleasing aesthetics,
- Overheating, signal interference, accidental disconnection, and lower life of the projector system
- Problem in identifying and resolving the issue during maintenance or modification to the projector system
These challenges can lead to
- Disrupted and disturbed audio-visual experience
- Electromagnetic interference causes image and audio distortion. The interference can damage the AV components and lead to unexpected disruption while watching the projector system.
- Costly and time-consuming maintenance and a higher probability of error during reconnections, ultimately leading to client dissatisfaction.
However, XTEN-AV resolves such issues during the initial phase itself. It automatically generates cable schedules, line schematics, and signal flow diagrams. These diagrams have clear labeling, length, and even suggestions for placement.
These automated diagrams ensure that you do not experience any issues with connecting the cables or managing the set-up. Here are the methods to ensure seamless cable management:
Cable Clips & Organizers:
Cable clips and organizers prevent cables from tangling. Additionally, you can use adhesive clips during the installation of the projector system. These clips ensure a smooth and clutter-free appearance of HDMI, power, and audio cables.
Wireless Streaming Devices:
You can use wireless streaming devices to provide a clutter-free, wire-free projector system. These devices use wireless HDMI transmitters that allow the streaming of 4K content without latency. Additionally, it simplifies the projector system installation significantly.
Concealed Wiring:
You can install cables and run them through the walls or ceilings if you use cables but want an aesthetically pleasing look. You can move cables through wall cavities if you use fish tape. You can also install hidden AV plates for a polished finish and conduits for easy replacements.
Step 8. Final Test Run & Adjustments
After successful projector installation, it is time for a final test run and to make necessary adjustments. The adjustments ensure that the AV projector design is optimal. They play a key role in providing the best viewing experience according to the end users.
Play Sample Content:
You must play a content sample to check the video and sound quality. You must choose a video with different scenes and sound levels. Playing sample content ensures all-around checking and a seamless viewing experience.
Check Playback Smoothness:
Ensure the projector set-up features smooth playback without any lags or distortions.
Fine-Tune Settings:
Fine-tune different settings once you have played the sample content and checked the playback smoothness. Fine-tuning comprises adjusting the brightness, contrast, and color accuracy. They ensure that the end users have an optimal viewing experience.
Once you’ve fine-tuned the settings, you have successfully set up the projector in the bedroom. While multiple ways exist for projector set-up, trending or creative ideas for the home theater design always stand out. Here are a few creative project set-up ideas:
Wha is the Creative Projector Set-up Ideas?
Ceiling-Mounted Hideaway
A retractable ceiling mount is one of the easiest ways to set up a projector in a bedroom. This keeps the bedroom clutter-free and multifunctional. This set-up helps you conceal your home theater projector when it is not in use. As a result, your bedroom theater remains aesthetically pleasing.
Adding a motorized projector screen can create a discrete home movie theater space without sacrificing design or functionality. You can lower the motorized screen from the ceiling with a single button press.
Wall-Space Utilization
Install a sleek shelf in your bedroom instead of a large TV stand or media cabinet. It holds the projector and a soundbar easily. This set-up is ideal for those who want a simple, space-saving solution without sacrificing the home cinema experience.
Embrace a minimalist look with your bedroom projector room ideas by using the largest wall as the screen. Use special projector-friendly paint to improve the color and clarity of the images.
Multipurpose Screen Frame
If your client is a movie theater fan, consider installing a multipurpose screen frame at the foot of the bed. The frame can function as a mirror or artwork when not in use. However, it can slide or flip to reveal a white screen when a movie is about to start.
This method for creating a projector bedroom enables a simple conversion. It changes the bedroom to a high-end home theater room. In addition, it eliminates the need for significant structural adjustments.
Corner Projection Alcove
Create a comfortable movie theater bedroom niche in the corner of the client’s bedroom. You can install a pull-down screen and acoustically treated panels in the corner. This set-up will create an instant luxury home theater set-up.
You can also add comfortable chairs, movable lighting, and even a little platform to raise the seating area. The platform will create a real movie theater experience in a bedroom. This is a small and comfortable set-up.
It allows the customers to use a particular section of the bedroom for entertainment. Moreover, it maintains the primary function of the bedroom, which is as a sleeping place.
The all-in-one solution for your AV needs
Transform your audio-visual experience with XTEN-AV.
No Credit Card required
AV Design Mastery + Winning Proposals = 10x Productivity!
- ✔ Automatic Cable Labeling & Styling
- ✔100+ Free Proposal Templates
- ✔ Upload & Create Floor Plans
- ✔1.5M Products from 5200 Brands
- ✔ AI-powered ‘Search Sense'
- ✔Legally Binding Digital Signatures
Conclusion
In conclusion, you must follow every step of this comprehensive guide. It sets up a creative and immersive premium home entertainment system in the bedroom. It ensures that the bedroom is more than a place to de-stress. Projector set-up in the bedroom creates a personal theater for your client. They can watch their favorite shows per their desires and requirements.
FAQ's
The best place to put a projector in your bedroom depends on several variables. These variables include the room’s dimensions, the projector’s throw distance, and your tastes. Ceiling mounts are popular since they provide an unhindered view and conserve floor space.
Consider installing a ceiling-recessed projector lift in your bedroom. A ceiling-recessed projector lift hides the projector when it is not in use. You can also place the projector inside custom furniture.
The furniture must contain a motorized lift mechanism or a manual hatch that opens when ready. Another option is to conceal the projector within existing decor, such as a false bookshelf or a decorative box.
Yes, you can use a projector instead of a TV. However, you must have enough space to set up the projector system. A projector can produce a cinematic effect and provide a larger image. For the best viewing experience, ensure a suitable screen or blank wall and adequate light control.
The room should be as dark as possible for the projector to work at its best because ambient light will distort the image. You can additionally install blackout curtains or shades to eliminate the light sources. Darker settings in a room improve the brightness and contrast of the projected image, even though a room with low lighting can still function.
Explore more by topic

AV Design Mastery + Winning Proposals = 10x Productivity!
- Automatic Cable Labeling & Styling
- 100+ Free Proposal Templates
- Upload & Create Floor Plans
- 1.5M Products from 5200 Brands
- AI-powered ‘Search Sense'
- Legally Binding Digital Signatures
No Credit Card Required
Related Blogs
-

- Posted by Sahil Dhingra
Audio Visual What Are the Different Types & Components of Access Control...

-
- Posted by Sahil Dhingra
Audio Visual Top 5 Project Management Software CRM & Invoicing Tools for...

-
- Posted by Sahil Dhingra
Audio Visual Paging and PA System Cost Estimation Guide Sahil Dhingra Published...