


Access Control System Installation Guide for Security System Integrators, Designers & Installers

Sahil Dhingra
Published 24 Nov 2025

Imagine, you walk as a security integrator into a commercial office buildout expecting a routine access control install recently. You expected an updated and state-of-the-art plan and system. Instead, you found an outdated floor plan, mismatched device specifications, and no wiring documentation.
On top of it, the building manager requests that the system be online within 72 hours. Sounds frustrating yet familiar? Without accurate drawings or a clear plan, even basic tasks, such as mounting card readers or terminating low-voltage wiring, became a matter of speculation.
In today’s security projects, access control system installation involves more than mounting a reader or wiring a magnetic lock. It requires detailed planning and integration with systems like fire alarm integrations and building security protocols.
Oversights, such as blocking ADA access with a reader or failing to isolate low-voltage cabling, are not just sloppy; they slow everything down. For commercial projects, they mean costly delays and dissatisfied clients.
This guide outlines the full installation process for AV and security system integrators and shows how XTEN-AV automates design, wiring diagrams, and proposals, before you ever get on-site.
Key Takeaways:
- Access control projects succeed when wiring paths, device placements, and lock types are mapped out clearly before installation.
- Understanding when to use fail-safe or fail-secure locks is essential for both safety compliance and physical security.
- Validating credentials, monitoring failover behavior, and exporting detailed checklists ensure system readiness.
- With XTEN‑AV, generate branded, install-ready proposals and BOMs directly from your access control designs, no manual quoting required.
The all-in-one solution for your AV needs
Transform your audio-visual experience with XTEN-AV.
No Credit Card required
How to install access control system step-by-step?
Access control system installation involves more than just running cables and mounting hardware. For AV and security system integrators, it’s a structured process that starts with an on-site assessment and ends with credential testing and system sign-off.
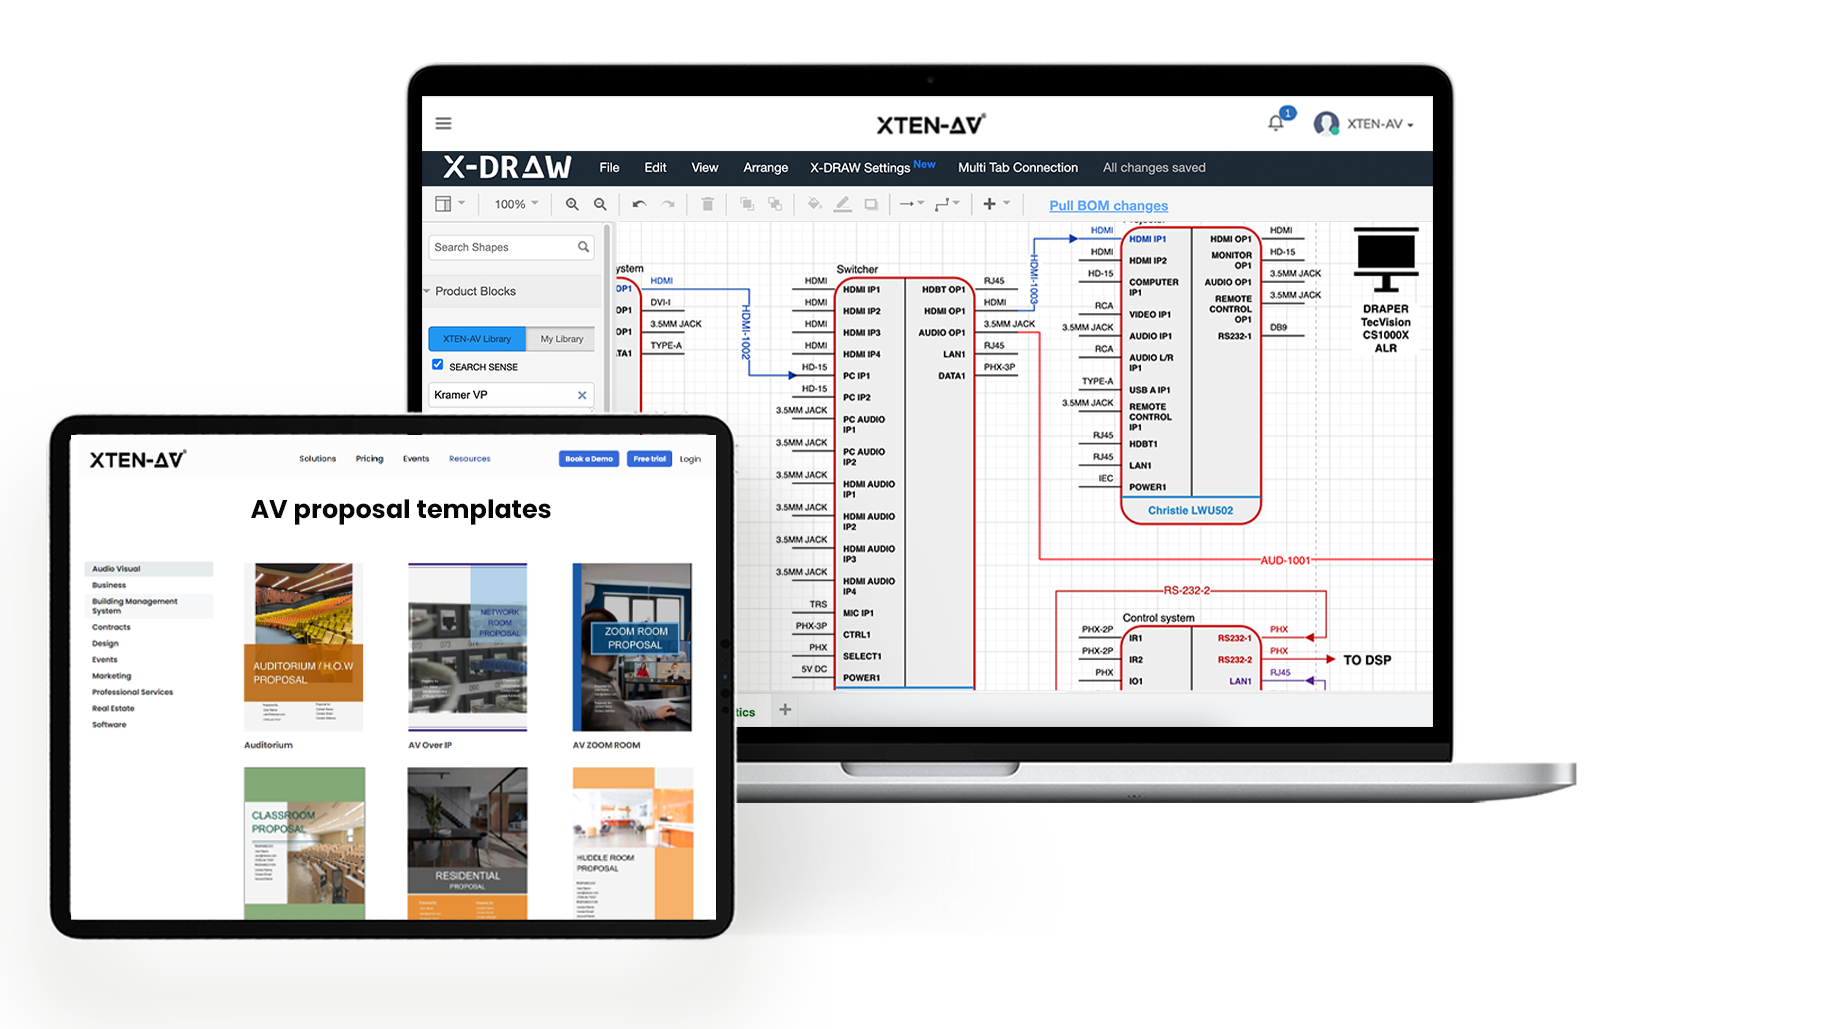
Every phase, device placement, wiring, and software setup have to align with both the security goals and code requirements. By using a platform like XTEN-AV, teams can generate accurate access control wiring diagrams, floor plans, and bills of materials before they even roll a cable.
Step 1: Pre-installation Site Assessment
Before installing the hardware, conduct a thorough walkthrough of the site. Identify entry and exit points, wall types, door hardware, and cable pathways. This helps determine where to install readers, electric locks, door sensors, and control panels.
For commercial access control systems, understanding traffic flow is essential. A good site survey also reveals if existing infrastructure supports low-voltage wiring or PoE (Power over Ethernet). XTEN-AV’s X-DRAW helps by allowing integrators to map layouts and tag device locations directly on CAD-based floor plans.
The all-in-one solution for your AV needs
Transform your audio-visual experience with XTEN-AV.
No Credit Card required
Step 2: Legal & Code Compliance Review
Before pulling any wire, check what’s allowed. Building fire codes, ADA compliances, and NFPA guidelines all apply to access control system installation. Some doors need fail-safe locks; others can’t block emergency exits. If a magnetic lock doesn’t release when the alarm sounds, it’s a violation. And local rules vary, so don’t assume.
As an AV and security system integrator, you can use XTEN-AV’s x-doc to build proposal documentation through templates that reflect code needs upfront. This makes sure the access control installation stays compliant from the start.
Step 3: Floorplan Review & Device Placement
You’ve got the floorplan now, it’s time to figure out where everything actually goes. Walk the site and think about how people move through each entry point. Place card readers where they’re easy to reach, not too close to metal frames, and clear of obstructions. Don’t forget keypads, door strikes, and REX sensors; they all need space to work properly.
If you’re using biometric access control systems, give them enough clearance to allow entry/exit seamlessly. With XTEN-AV floor plan design software, you can tag each device directly on the plan and generate clean wiring diagrams while you design.
Step 4: Pull and Terminate Low-Voltage Wiring
Once device placement is confirmed, cabling begins. Run individual low-voltage lines, such as door strikes, card readers, and REX sensors, back to the access control panel. Follow separation rules for power and data to prevent interference. Stick to wide bends, avoid pinch points.
Label every endpoint clearly and make no assumptions during commissioning. This is where XTEN-AV comes in. XTEN-AV’s av specific wiring diagram software keeps the wiring map accessible during field execution.
Step 5: Mount Electric Locks
Once the layout’s finalized, it’s time to mount the electric locks. Most setups will involve either a strike plate or maglock, installed directly on the door frame. It’s a good idea to reference the specific mounting guide for your device; those templates save time and minimize rework. Be sure the alignment is spot on, or you’ll end up with latch issues later.
Also, when routing wires through the frame, insulated grommets help protect against long-term wear. For doors requiring fail-safe or fail-secure configurations, confirm correct wiring based on system requirements.
Step 6: Connect locks to the controller
Once the locks are physically mounted, it’s time to connect them to the controller. This part requires some focus. You’ll need to match the wiring based on the specifications from your diagram. Magnetic locks often need continuous power, so check your voltage setup twice. For added protection, a relay or inline fuse can make all the difference later if something shorts or malfunctions. Little things like that can prevent bigger issues during final testing.
Step 7: Install Access readers and wire to the panel
Begin by installing the access readers near the designated entry points, typically on the secure side, positioned for ease of use. Fasten the readers using the manufacturer’s recommended hardware. For wiring, stick to low-voltage cable, and try to route it efficiently to the panel, avoiding any high-voltage interference nearby. Maintain separation for EMI reduction. At the panel end, leave some slack for serviceability, and label each conductor clearly to simplify troubleshooting later.
Step 8: Connect the power supply and backup
Start by linking the main power line to the controller, matching voltage and polarity exactly as required. Once that’s set, add the backup battery; it’s there to keep things running if the primary supply drops. Make sure the fuse size fits the load to prevent any electrical hiccups. Place the battery where airflow isn’t blocked, and it’s easy to check later. Finally, run a quick test to make sure it switches over cleanly when needed.
Step 9: Configure software and network
Begin by installing the software on a local machine that’ll serve as your admin console. Double-check system requirements before setup. Assign a static IP to the controller to avoid future network issues. Connect the hardware, set access levels and time rules, include holidays, and make sure everything syncs. Don’t forget to save a backup before wrapping up.
Step 10: Test every door for credential flow, lock behavior, override functions
With everything in place, go door by door and run a complete check. Use a test badge or card and see how the system responds. Does the reader recognize it immediately? Watch how the door reacts: it should unlock without sticking and return to its locked state once released. Also, make sure any manual overrides, like exit buttons or fail-safe features, work on cue. If something feels off, even slightly, it’s worth looking into now before the system goes live.
Step 11: Onboard users
Once the system’s live, begin adding a handful of users, start small to make sure everything’s working right. Input their details manually, choose access levels that match their roles, and register their credentials, whether it’s a keycard, phone ID, or something else. Make sure each profile reflects the person’s actual clearance needs; no more, no less. Before rolling out to the rest of the team, have these early users try logging in at different doors. It’s an easy way to catch mistakes in access permissions or credential setup before things scale.
Step 12: Final walkthrough and client sign-off
Before wrapping up the access control system installation, conduct a full walkthrough with the client. Demonstrate key features like card reader access, multi-factor authentication, and audit trails via the ACS software. Ensure user credentials function properly across all access points. Address any questions and document the system configuration. Once approved, the security system integrator can officially hand off the project, ensuring a smooth start to secure, high-quality building operations.
How much does it cost to install an access control system?
Access control pricing is never one-size-fits-all. For example, a single door installation could cost $1,200, or it might run up to $2,500. That’s if you’re starting from scratch. Already have hardware? The cost drops, maybe $500, maybe $1,500. It depends on labor and what needs reconfiguring.
Now, different access methods change the numbers. Keypad locks / PIN Codes? Simple. Think $1,000 to $2,500. Swipe cards or key fobs are slightly higher, $1,500 to $3,500. Want mobile credentials or cloud-based access control? Then you’re in the $2,000 to $4,500 range, give or take. Biometrics? That jumps fast. Some setups go past $10,000, especially in high-security environments.
That’s not all. Software licenses add recurring costs. Expect $600 to $1,600 per door each year. And installation fees vary. A lot. It depends on who’s doing the work and how complex the job is.
So how do you keep it on track? Start with a complete bill of materials. Don’t leave anything out. Every missed wire or skipped bracket adds up. Platforms like XTEN‑AV help automate that, from BOMs to drawings, so you’re quoting faster and getting it right the first time.
What Wiring and Network Design Should Security Integrators Plan Before Access Control Installation?
Let’s say you’re setting up access control for a multi-floor office. It’s not just about placing card readers; you’ll also need to think through how your wiring and networking will support the system without causing future headaches.
Start with PoE controllers. These make installations cleaner by powering devices like readers and cameras over Ethernet, cutting down on the need for separate power cables. But don’t skip voltage drop planning, especially on longer cable runs. If power drops too much before it reaches your device, performance can suffer or fail entirely.
Next up: power zoning. By breaking up your layout into smaller power zones, you reduce the chance of a single failure affecting your whole system. It also simplifies maintenance.
And when it comes to cabling, clean routing is more than just neatness; it prevents interference, supports airflow, and improves long-term serviceability.
To avoid problems later, map everything out before installation. Tools like XTEN‑AV let you plan device placement, wiring paths, and power distribution with clear diagrams, so you’re not second-guessing anything during setup. That level of preparation can save hours in the field and help ensure long-term reliability.
How Do You Choose Between Fail-Safe and Fail-Secure Locks in an Access Control System?
Deciding between fail-safe and fail-secure locks isn’t just a hardware call; it depends on what the door is protecting and how it’s expected to behave during a power cut.
Fail-safe locks unlock when the power goes out. That’s why they’re commonly used on safety doors, like exit routes or stairwells. They’re also tied into fire integration systems, so people can evacuate quickly in an emergency. In many cases, building code compliance actually requires this setup.
Fail-secure locks do the opposite; they stay locked when the power cuts out. You’ll typically see these on security doors, like equipment rooms or IT closets, where keeping people out during an outage is the priority. It really comes down to what matters more at that door: safe exit or strong protection. But mapping that out across dozens of doors gets messy fast.
XTEN-AV templates help simplify it. They connect real use cases with the correct lock type, and make sure each door’s function aligns with both safety standards and building codes, without second-guessing.
This way, you’re not just choosing the right lock. You’re designing the right response.
What Are the Most Common Access Control Installation Mistakes (and How Can Security Installers Avoid Them)?
Picture this: You’re mid-project on a commercial access control setup. The system’s wired devices are mounted, and you’re ready to power up, only to realize the circuits are overloaded and half the components aren’t responding. Sound familiar?
One of the biggest missteps in access control installation is skipping proper voltage drop planning, especially when using PoE controllers or long cable runs. It compromises reliability and can cause system downtime. Another mistake? Poor device placement. Sensors too close to doors or badge readers blocked by obstacles weaken physical security and open doors to unauthorized access.
Lack of clear documentation also creates long-term headaches. Without a reliable access control installation guide or floorplan CAD export, troubleshooting becomes speculation. That’s where XTEN-AV’s accuracy shines; it maps access control system design with precise layouts, rack elevation diagrams, and signal flow schematics, reducing costly rework.
To stay ahead, follow access control best practices: clean routing, accurate power zoning, and consistent labeling. Use design software for security systems to plan for future upgrades, alarm system integration, and user credential management.
Avoid these mistakes, and your access control project won’t just function. It’ll become a highly secure, future-proof solution.
How Do You Configure and Test an Access Control System After Installation to Ensure It Works Reliably?
Once the hardware is in place, configuring the access control system isn’t just a final step; it’s where everything comes together. Start with software setup. This includes defining user credentials, setting access levels based on your security policy, and linking zones to specific devices like readers or electronic locks. For commercial access control setups, this step should also cover security camera integration and alarm system pairing to support a layered physical security strategy.
Next, assign credentials like badges, mobile devices, or biometric IDs, and test each access point. Don’t just check entry; also test restrictions, failover modes, and what happens during system downtime. Create an audit trail by logging test access events, then review for unauthorized access attempts or misconfigured zones.
Tools like XTEN-AV simplify this stage. You can export device states, generate post-installation checklists, and map every component, from building security zones to floorplan CAD exports. You can also rack elevation diagrams, signal flow schematics, and even your BOM (bill of materials). This helps security teams keep maintenance checks and project documentation aligned for long-term performance.
Testing isn’t optional; it’s essential for delivering secure solutions that actually hold up when the system is under pressure.
How Can Security Integrators Turn an Access Control Design into a Professional, Client-Ready Proposal?
Creating a polished, install-ready proposal shouldn’t require jumping between spreadsheets, PDFs, and quoting tools. With a dedicated security system design software, you can streamline the process and generate professional proposals directly from your access control design files.
You can choose XTEN‑AV for this. It has the proprietary and industry’s first AV Specific AI Tool that is XAVIA that helps you to pull in every detail. These details comprise information about door access control devices, readers, power supplies, electronic access control hardware, and networked components with a single command. Afterwards, it auto-generates a branded, data-rich proposal with the help of x-doc that includes pricing, scope of work, and your full bill of materials (BOM). No manual quoting, no formatting headaches.
These proposals are structured around your exact security policy and access levels, aligning with your physical security system goals and facility requirements. Whether you’re mapping out building security zones or planning the full access control installation steps, XTEN‑AV ensures everything is accounted for, right down to cable lengths and device configurations.
Even better? Project management gets easier when everything’s in one place: task lists, design revisions, and notes. You don’t lose time chasing updates. And when that proposal goes out? It’s not just a polished file. It shows exactly what’s doable, what’s needed, and what the real-world plan looks like on-site.

AV Design Mastery + Winning Proposals = 10x Productivity!
- ✔ Automatic Cable Labeling & Styling
- ✔100+ Free Proposal Templates
- ✔ Upload & Create Floor Plans
- ✔1.5M Products from 5200 Brands
- ✔ AI-powered ‘Search Sense'
- ✔Legally Binding Digital Signatures
Conclusion
From overloaded circuits to poor cabling and misconfigured locks, the smallest oversight in access control installation steps can lead to major vulnerabilities. But when every component, from electronic access control devices to security policy tiers, is mapped with precision, you gain both system resilience and project efficiency.
XTEN‑AV bridges the gap between design intent and real-world deployment. It ensures seamless access control system installation by automating project management and validating access levels. It also exports test-ready checklists, and even generates branded proposals with your BOM built in.
So, whether you’re securing a facility with complex door access control or scaling up a multi-site building security rollout, getting it right means designing smarter, not harder. And with XTEN‑AV, smarter is built in.
Register now for a 15-day trial to integrate smartness in access system control system installation or book live free demo to learn all about it.
FAQ's
Install time varies, usually between 2 and 4 hours per door. It depends on door type, cabling complexity, and whether you’re using biometric access, keypad locks, or PoE switches. A solid, pre-planned building security setup helps move things faster.
Maglocks need constant power to stay locked, so if power cuts, they unlock. Electric strikes do the opposite; they can stay locked even without power. Strikes are often better for emergency exits and ADA compliance. The right choice depends on how your access control system is set up.
Yes, they usually can. In a fire, the system releases doors so people can exit safely. That’s why cloud-based access control platforms often include this. It’s not just a feature, it’s about meeting safety codes and designing for real emergencies from the start.
It can cost anywhere from $500 to $2,500 per door. The price really depends on cabling, system type, biometric access, or keypad loc, all of which affect it. If you figure out the bill of materials early, it’s easier to stay on budget.
Yes, platforms like XTEN-AV let you export CAD and BIM-ready access control drawings, complete with PoE switch locations, device tags, and wiring paths. It’s ideal for cloud-based access control projects needing detailed design files.
XTEN‑AV simplifies it all, automating layouts, picking devices based on security needs, generating quotes with a full BOM, and exporting CAD/BIM files. It’s a cloud-based access control solution built for real-world efficiency.
Explore more by topic

AV Design Mastery + Winning Proposals = 10x Productivity!
- Automatic Cable Labeling & Styling
- 100+ Free Proposal Templates
- Upload & Create Floor Plans
- 1.5M Products from 5200 Brands
- AI-powered ‘Search Sense'
- Legally Binding Digital Signatures
No Credit Card Required
Related Blogs
-

- Posted by Sahil Dhingra
Audio Visual A Complete Guide to Commercial AV Companies: What to Expect,...

-
- Posted by Sahil Dhingra
Audio Visual 6 Best Field Service Management Software for Audio Visual (AV)...
-
- Posted by Sahil Dhingra
Audio Visual What Is an AV Connection Check and Why Does It...