Setting Up a PA System for a Live Event: A Step-by-Step Guide for AV Professionals
Having been an AV professional, you grasp one of the key components to the effective management of live events, which is a good sound system. Not only is there a need to deliver an electrifying performance at a concert, but it is also necessary to bring out clear tones at a conference or even dance the night away at a wedding. A proper way to set up a Public Address System cannot be argued.
However, getting the perfect sound, which many claim to be a virtue of speakers and microphones, does not suffice. It requires a sound strategy, AV design setups, good knowledge of an audio system’s gears, and the ability to fix what may go wrong on the spot.
From the information contained in this blog and the subsequent procedures outlined below, you will be well armed with the necessary knowledge for the setup of the PA system that produces optimum quality sound and the best-enhanced experience for any event.
Design Professional-Grade PA System Layouts in Minutes with XTEN-AV
The all-in-one solution for your AV needs
Transform your audio-visual experience with XTEN-AV.
No Credit Card required
Key Takeaways
- learn about the different components of a PA system and how they work together to produce sound.
- Know the steps involved in setting up a PA system for a live event.
- Discover the different types of PA systems and when to use them.
What is a PA System?
Public address system setup means arranging the PA system by setting up the main installations, such as speakers and microphones.
A Public Address (PA) System is also referred to as a sound reinforcement system or simply a sound system setup is a collection of acoustic systems with the primary goal of providing the enhancement of sound within a particular locality. Technical PA system setup plays a crucial role in any live event so as to relay the audio to the ears of the listeners effectively.
AV Design Mastery + Winning Proposals = 10x Productivity!
- Automatic Cable Labeling & Styling
- 100+ Free Proposal Templates
- Upload & Create Floor Plans
- 1.5M Products from 5200 Brands
- AI-powered ‘Search Sense'
- Legally Binding Digital Signatures
No Credit Card Required
What Are the Basic Components of a PA System?
Here is the equipment you need for a PA system set up:
Speakers:
These are the last ones in the sequence of audio processing, and their role is to transform electrical signals into audible sound waves.
- Passive Speakers: These need external power and are usually associated with a power amplifier that is fed by signals from a mixer.
- Active Speakers: They come equipped with integrated power amps attached to a mixer for a seamless connection process.
Mixer:
This is the main control point in the PA system, where you can mix the sound from different sources like microphones, musical instruments and playback equipment.
- Combining Audio Sources: Assist in connecting two or more microphones, speakers, musical instruments, laptops, and other sound inputs.
- Adjusting Levels: Take charge of the volume of those inputs and the volume of the output as well to facilitate balance.
- Applying Effects: Next get into the mixer section where the sound can be further improved using equalisation (EQ), reverb, delay and other utilities.
- Routing Signals: Record the audio to the various speaker PA systems or recording devices, as the case may be.
Microphones:
These collect sound and then transform the sound into electrical signals. Different types of microphones are suitable for various applications:
- Dynamic Microphones: These mics are strong and portable thus ideal for live vocal purposes and for those applications that involve high SPL.
- Condenser Microphones: These are more sensitive and detailed and are typically used for studio recording and, for the recording of the sound quality.
- Wireless Microphones: Make it possible for the dancers to move around on stage without the cables hindering them.
- Amplifiers (for Passive Speakers): These increase the low-level signals from the mixer to a power level that can power the passive speakers. It is necessary for facilities with a large area, or when connecting several passive speakers.
Cables and Connectors:
These are the necessary connections that transfer audio signals between components of the PA system. Common types include:
- XLR Cables: These are used for balanced audio connections, especially with microphones and most of the professional audio devices.
- TRS Cables: These can be used to connect unbalanced audio cables, instruments, and sometimes speakers.
- Speak ON Cables: They are particularly used for connecting with high-power speakers to guarantee the safety and stability of the connection.
DI Box (Direct Injection Box):
DI box helps to protect high-impedance signals of the musical instruments to accommodate them to low-impedance used in consoles. This is particularly useful where you want the instruments to be connected directly to the PA system.
How to set up a PA system step by step?
PA system set up for a live event involves interconnected steps. Each step ensures a seamless audio experience for both performers and the audience. Let’s understand in a step-by-step process:
Step 1: Planning and Preparation
Planning is crucial before delving into the technical arrangements. This stage is aimed at examining the conditions of the venue, identifying the peculiarities of the event, and collecting all the necessary equipment.
You can leverage XTEN-AV’s comprehensive audio visual design templates to streamline this process. These templates offer a structured approach to planning, including pre-designed layouts, automated BOMs (Bill of Materials), audiovisual schematic diagrams, and rack drawings.
Step 2: Setting up the Speakers
The location of the speakers is one of the most vital aspects that define the general quality and the extent to which the speakers’ PA system covers a given area. Firstly, stand your key speakers as you aim them towards the intended audience in order to broadcast their speeches effectively. The size of the venue and layout will depend on the actual height of a particular speaker and the distance between the speakers.
Achieving balanced sound distribution can be challenging for venues with ceiling speakers. You can utilize online tools like the XTEN-AV Ceiling Speaker Placement Calculator to simplify this process. By inputting the room’s dimensions, ceiling height, and the type and number of ceiling speakers you plan to use, this calculator generates a precise 2D diagram illustrating the optimal placement for each speaker. This ensures even coverage throughout the venue, minimizing acoustic dead zones and hotspots.
Step 3: Connecting the Mixer
The mixer acts as a central stage to where all signals are channeled and processed to come up with the final output. Place the mixer appropriately, preferably inside the stage or the area where the performance is to be held. Start by joining the speakers to the mixer through the cables in this case the XLR or TRS cables based on the mixer and speakers being used. Check that the connections are tight and that the speaker cables are long enough to reach the expected positions.
Step 4: Microphones and Inputs
Plug the mics into the mixer’s line inputs using XLR leads. Facilitate each microphone to its individual channel and enable individual volume and equalizer controls on the chosen channel. If other input sources are available, like musical instruments, laptops, playback devices, etc., link them to the required inputs on the mixer. When labeling each input, be sure to make it easy to differentiate them when the event is in progress.
Step 5: Soundcheck and Adjustments
With all components connected, one must ensure all is well by conducting a sound check. It is recommended that tests be run with each microphone and all the input sources separately and that levels and equalization be adjusted. Be sure to listen carefully to the information you are receiving and adjust the microphone position or equalizer settings as needed. Regulate the total volume in an individual small section in order to make it clear to adjust for the bandwidth of the event as desired.
Step 6: During the Event
Be as proactive as you can with the sound system setup during the event. Audio levels should also be monitored closely in an effort to maintain a good workable level without compromising on quality. Be ready to tackle any technical glitches that may crop up nearly instantly. Being attentive to issues surrounding audio volumes or echo is key, especially when dealing with performers or presenters.
Step 7: Post-Event Breakdown
It’s also important to pack the PA system after the event has come to an end so as to ensure that it is put back in its proper place. Firstly, turn off all components located on the amplifier then turn off the mixer at the same. It is important to unplug all cables to avoid short circuits and label or arrange them in a way that they can easily be plugged back if needed. To require no tangling or damage simply wrap cables by coiling them.
Place each of them in the respective box or case, providing sufficient padding to delicate items if necessary. This cautious approach to breakdown directly safeguards your investment apart from making subsequent setups easier and more efficient as your Public Address system setup will remain in superb condition for years.
Where do you need a PA System Setup?
Conventions are important because they are used to hold various events, and every event has different audio needs that are met by PA systems. By knowing in detail, the various circumstances that this type of setup is necessary, you will be able to customize the setup accordingly.
Auditoriums
Auditoriums are those areas where speeches, presentations, and performances are most essential, thus making the right AV system design setup for auditorium crucial. Much as it is in music performance, the aim is to ensure that any of the words spoken or notes played are heard by each and every member of the audience, no matter where he or she is seated.
As for the PA system, it entails the installation of speakers in strategic positions in the auditorium, mic mixing, and speakers that are appropriate for amplifying voices and instruments.
Presenter or Karaoke:
This is the simplest setup, typically involving a single powered speaker with a built-in mixer or a compact, portable PA system setup. It’s suitable for small gatherings, meetings, or informal presentations where a single microphone is sufficient for amplifying a presenter’s voice. For karaoke, additional microphones can be connected to multiple singers.
Sports Bar/Lounge:
In a lively sports bar or lounge environment, the PA system set up serves a dual purpose: providing background music and amplifying live events like karaoke or DJ performances. The PA and or lounge focuses on creating an immersive audio visual atmosphere that enhances the overall ambiance.
The audio part might involve using a combination of ceiling speakers for background music and floor-standing speakers for live performances, all controlled through a mixer that allows for seamless transitions between different audio sources.
Singer-Songwriter or Musician:
This setup necessitates the use of a mixer with multiple tracks to account for the vocals, instruments, and, possibly, stage monitors. A standard PA system setup is for a mixer having two or more channels and one or two main speakers, along with one or two mics for vocal and other acoustic instruments. For electric instruments, a DI box may be needed to use the cables to connect the instruments directly to the mixer.
Full Band or Music Group:
This is a more complex setup where there is a large mixer with many channels and a stage monitor; there could also be a stage snake to manage cables. This cable management setup necessitates a mixer with an adequate number of channels capable of handling vocals, a microphone for drums and instruments, and an auxiliary send for stage monitors. A stage snake can help bypass the problem or cable management and take up less space on the stage.
Large Performance Venue:
This calls for a complex PA system setup that involves the use of multiple speakers, subwoofers, wireless microphones, and, depending on the type of event, even a monitor mixer. Venues of this size demand a more sophisticated system where speakers are organized in sections referred to as arrays.
Subwoofers are frequently used for low-frequency passages, and wireless microphones are useful for performers who need to move around the stage. A separate monitor mixer can be utilized to have a monitor mix for performers along with the general sound mix.
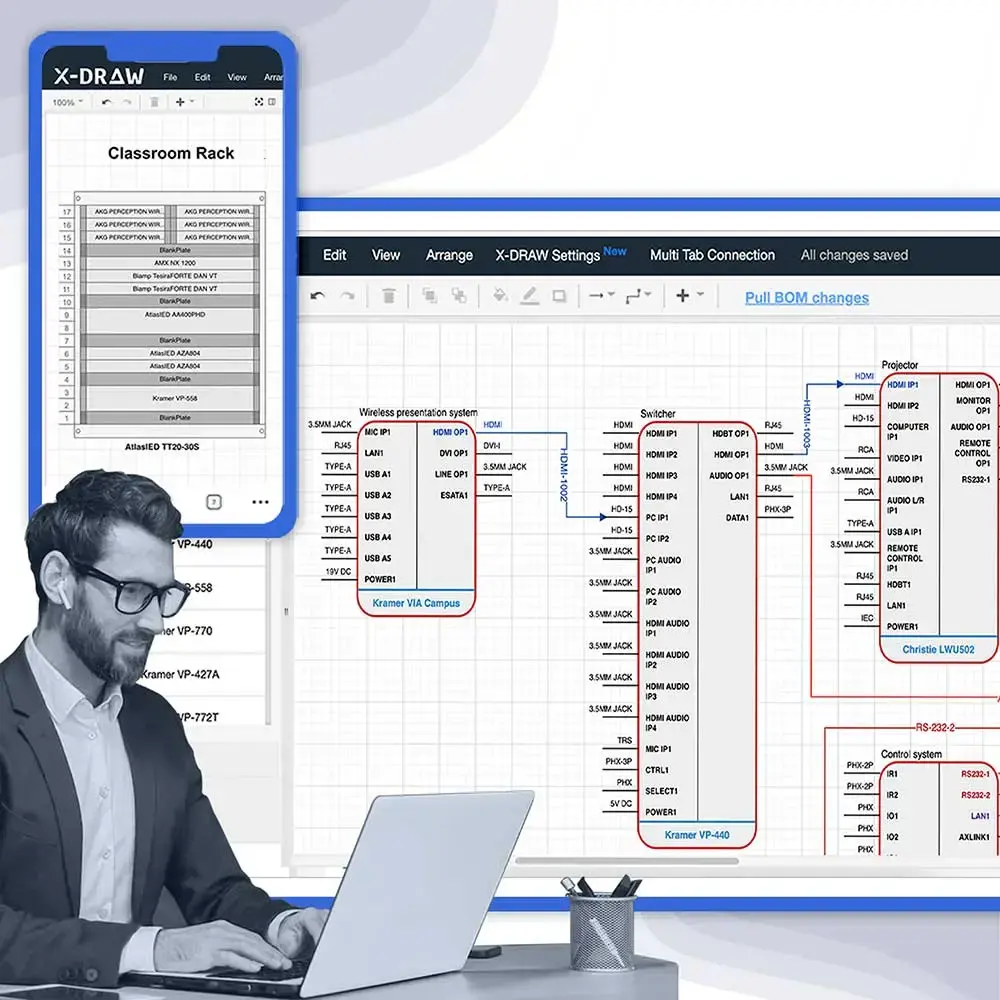
Enhance Your PA System Live Sound Setup Diagram with X-DRAW
Setting up a sound system for a live event can be a unsettling task, but with the right tools and knowledge, you can create an exceptional audio experience.
With X-DRAW, you can simplify the complexities of audio system design. Our intuitive software provides you with the necessary tools to plan and execute a flawless sound system setup. Here are the key benefits of using X-DRAW for your PA System Live Sound Setup Diagram:
- Reduces the time taken in developing accurate PA system layouts which identifies the positioning of speakers, microphones and beat mixing equipment for efficiency.
- Saves time that would otherwise be spent on repetitive tasks such as fixing cables, labeling, and styling to ensure orderliness and to avoid mistakes.
- Provides access to a library of pre-designed AV templates that can be customized for your specific PA system setup, saving time and enhancing accuracy.
- Facilitates seamless collaboration by allowing you to easily share diagrams with team members and clients for real-time feedback.
- Offers a comprehensive library of 1.5 million products from 5200 leading AV brands, enabling you to select the best equipment for your PA system.
- Utilizes AI-powered features like “Search Sense” to provide a personalized and efficient search experience for finding the right equipment and designs.
- Enables the users to define their own product libraries that suit their particular needs better, providing them with more flexibility when it comes to selecting parts for their PA system.
Are you ready to take your PA System setup to the next level? Experience the power of XTEN-AV’s X-DRAW, the best AV design software that streamlines your workflow and enhances your projects.

AV Design Mastery + Winning Proposals = 10x Productivity!
- Automatic Cable Labeling & Styling
- 100+ Free Proposal Templates
- Upload & Create Floor Plans
- 1.5M Products from 5200 Brands
- AI-powered ‘Search Sense'
- Legally Binding Digital Signatures
No Credit Card Required
Conclusion
Mastering the art of PA system setup is a fundamental skill for any AV professional. Following these instructions and utilizing tools like the XTEN-AV Ceiling Speaker Placement Calculator shall enable efficient and high-quality audio in every event under your management.
Keep in mind that a well-designed and well-executed PA system not only makes the audience happy, but it also shows your capabilities and professionalism in the field of Audio Visual industry.
To experience the power of XTEN-AV’s tools firsthand, book a demo today or take advantage of our 15-day free trial.
FAQs
When preparing for a live show, the initial procedure is to set up a powerful PA system. This involves, for example, orienting the speakers so as to get the best possible reach, as well as plugging them into the mixer and equalizing the sound. Make sure that the microphones used for recording are placed correctly and make a complete check of all sound system to make necessary adjustments.
Setting up a PA system requires the speaker to factor in the size of the hall needed for the event. Turn the main speakers PA system towards the audience while making sure all attendees are within the range of amplification. In case you are using subwoofers then they should also be well-positioned to improve low-frequency response. Raise speakers on stands and position them to provide the best coverage for the sound waves. Ensure all components are well connected to the mixer for a good public address system installation.
There are mainly three categories of PA systems, portable PA systems, fixed installation PA systems and personal PA systems. Small portable PA systems are convenient since they are easy to carry around, best suited for small events. Installations include permanently installed loudspeakers in an environment such as an auditorium. Spotlight PAs are intended for individual performer or a small group of performers.
A PA system diagram is a graphic display of the PA system and how the different parts are connected. It often comprises of speakers, mixers, microphones, amplifiers and cables. This diagram can be especially useful as the basic guideline for setup and further troubleshooting of the public address system.
Despite the fact that both systems use audio equipment, a PA system primarily refers to amplifying and broadcasting sound to a large group of people. AV systems also include a broader scope of equipment such as projector, screen, camera, video switcher for presentation and other forms of multimedia.