Security Site Survey for System Design & Integration Checklist

Sahil Dhingra
Published 31 December 2025


A security site survey is one of the most critical steps in building a reliable protection strategy for any facility. Whether you are designing a new security system or upgrading an existing one, the security survey lays the groundwork for everything that follows: system design, equipment choices, installation, and long-term performance. When done poorly, a site survey can leave blind spots, create compliance risks, and drive up costs with unnecessary hardware. Following proper site survey steps ensures you capture all critical details during a physical security site survey, making your recommendations reliable and compliant.
This guide walks you through the essential site survey steps, from early planning to final documentation. You’ll find practical methods, proven approaches, and tools that experienced security system design consultants rely on in the field. If your goal is to streamline assessments and deliver stronger proposals, this step-by-step framework will give you a clear path to conducting a successful security site survey.
The all-in-one solution for your Security System Design & Installation needs
Transform your audio-visual experience with XTEN-AV.
No Credit Card required
Key Takeaways:
- A security site survey ensures systems are designed for real conditions, avoiding costly redesigns later.
- Accurate device placement, camera coverage, and access control layout are critical to eliminating blind spots.
- Environmental and regulatory factors must be considered before finalizing any design.
- Digital tools like XTEN-AV’s X-DRAW and X-DOC streamline floor plans, BOM creation, and proposals.
- Collaboration with teams, vendors, and stakeholders builds trust and validates design choices.
- A professional site survey report doubles as an as-built record for future upgrades and maintenance.
Steps to Conduct a Successful Security Site Survey for System Design and Integration
1. Pre-Survey Planning & Preparation
A successful security site survey starts long before you arrive on-site. First, you will want to define your objectives. Are you conducting the site survey for a new installation, an upgrade to existing systems, or a compliance-driven assessment? Defining the scope early is a key part of security site assessment and helps you efficiently engage in site survey work with minimum errors. Clarification will give you a clear view of the systems you want to look into, be it access control, CCTV, intrusion alarms, or fixturing network infrastructure. Set clear success criteria regarding coverage, budget, and timelines so that everyone is on the same page.
One must next gather all the possible documentation. Ask the client, or facility team for a floor plan, network diagram, and a list of existing equipment. If you cannot get hold of detailed blueprints, satellite maps or fire-escape-layouts can at least offer you great aid at the start and save time during your walkthrough.
Planning the team and agenda comes last. Determine who might be interested in joining, e.g., security managers, office staff, IT infrastructure, or facility engineers. Next, prepare a site survey checklist that guides the process. You can create digital floor plans using XTEN-AV’s X-DRAW and sketch some initial layouts beforehand to demonstrate to your clients that you come into the project ready and willing to add value.
2. Obtain and Digitize Floor Plans (Site Maps)
A security site survey’s precision depends heavily upon the availability of a proper map. A scaled floor plan enables the surveyor to begin choosing the exact placement for security cameras, sensors, or access points. Skipping comes with a price, with guesswork usually resulting in missed coverage and a redesign later on.
Inquire from the client or the facilities team for official blueprints. If those are not available, there are practical alternatives. Many integrators use satellite images for outdoor layouts, while older sites often provide fire-escape plans that can be repurposed. Even a rough sketch can work if you digitize it before the walkthrough.
Working with a map? Getting it digitized in a floor plan design tool like the XTEN-AV X-DRAW would be the goal first: Import it and scale it with a specific dimension-on a doorway, say, or a hallway-to calibrate accuracy. Use a high-resolution image (300 dpi) and end with a standard format-set to PDF, DWG, or JPG-so the device placements will seem professional and precise.
Pro Tip: Always check the scale accuracy before placing any devices on the digital plan.
3. Inventory Existing Infrastructure
When you conduct a site survey, one of the most important steps is taking stock of what is already in place. Begin with the physical devices. Record all CCTV cameras, card-readers, intrusion sensors, alarms, and intercoms you find there on-site. Keep details like make, model, its present condition, and mark their location on your floor plan.
Next, review cabling and power infrastructure. Trace cable runs, conduits, outlets, and network closets. Document control panels, servers, and switches that feed the system. Make note of whether devices are running on PoE or require specialized power.
Assess access and control points as well. Check for lock types, door hardware, access panels, and wall mount strength, recording whether these systems conform to life safety and egress codes, and highlight any equipment that is either outdated or nearing end-of-life.
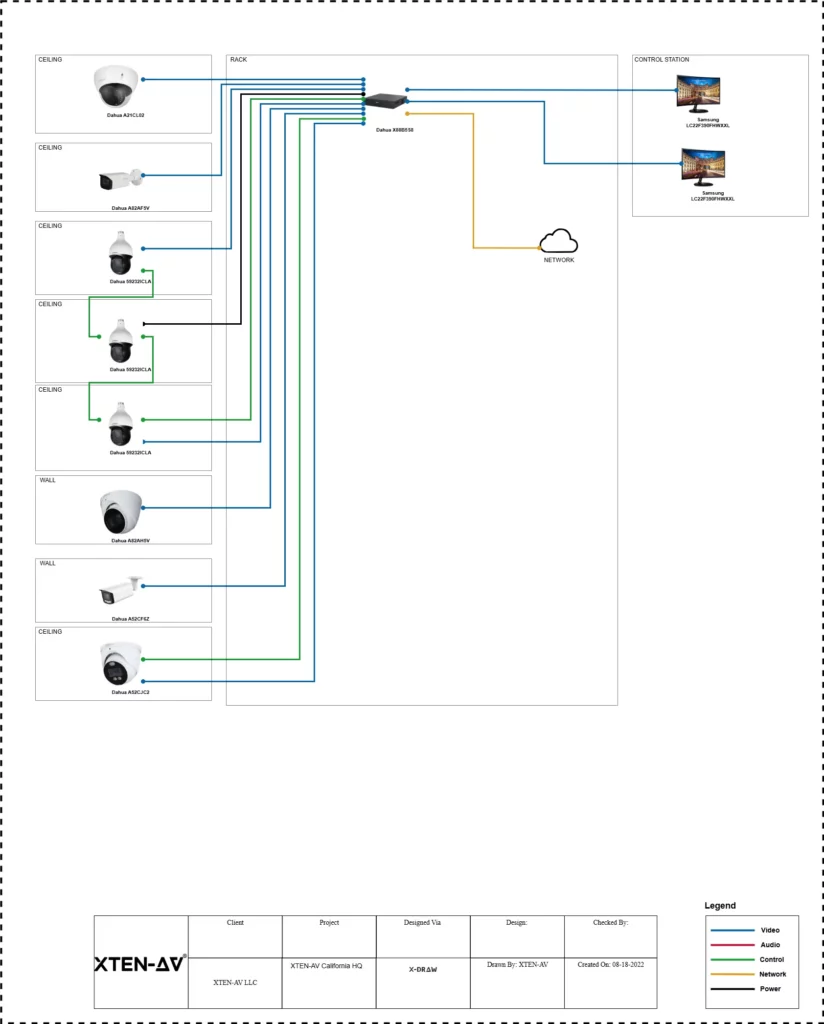
This information becomes invaluable later in the security system design phase. Many integrators import their survey notes and floor plans into tools like XTEN-AV’s X-DRAW, which allows you to map existing and proposed devices in one place. This creates a clear digital record that supports both design and proposal development.
Pro Tip: Do not pass up older pieces of equipment just because they look outdated. Knowing what exists on the ground goes a long way toward duplicating, wasting in costs, and irritating the client.
4. Define Security Goals & Requirements
When conducting a site security survey, never rush to the floor plan or equipment list. Start with a genuine conversation with those who know the site best. Ask them what issues they may have encountered, have they had any recent incidents, or might be upgrading to some new technology, perhaps AI-enabled cameras, or new access control. Those conversations reveal priorities not found on any blueprint.
As you walk the site, connect goals to specific use cases and risk areas. A loading dock might need better monitoring for deliveries, while an IT room may require strict access limits. Tailoring your security system design to each zone makes your recommendations far more effective.
Keep regulations and policies in mind as well. Some facilities must meet fire codes, data protection requirements, or mandatory CCTV coverage rules.
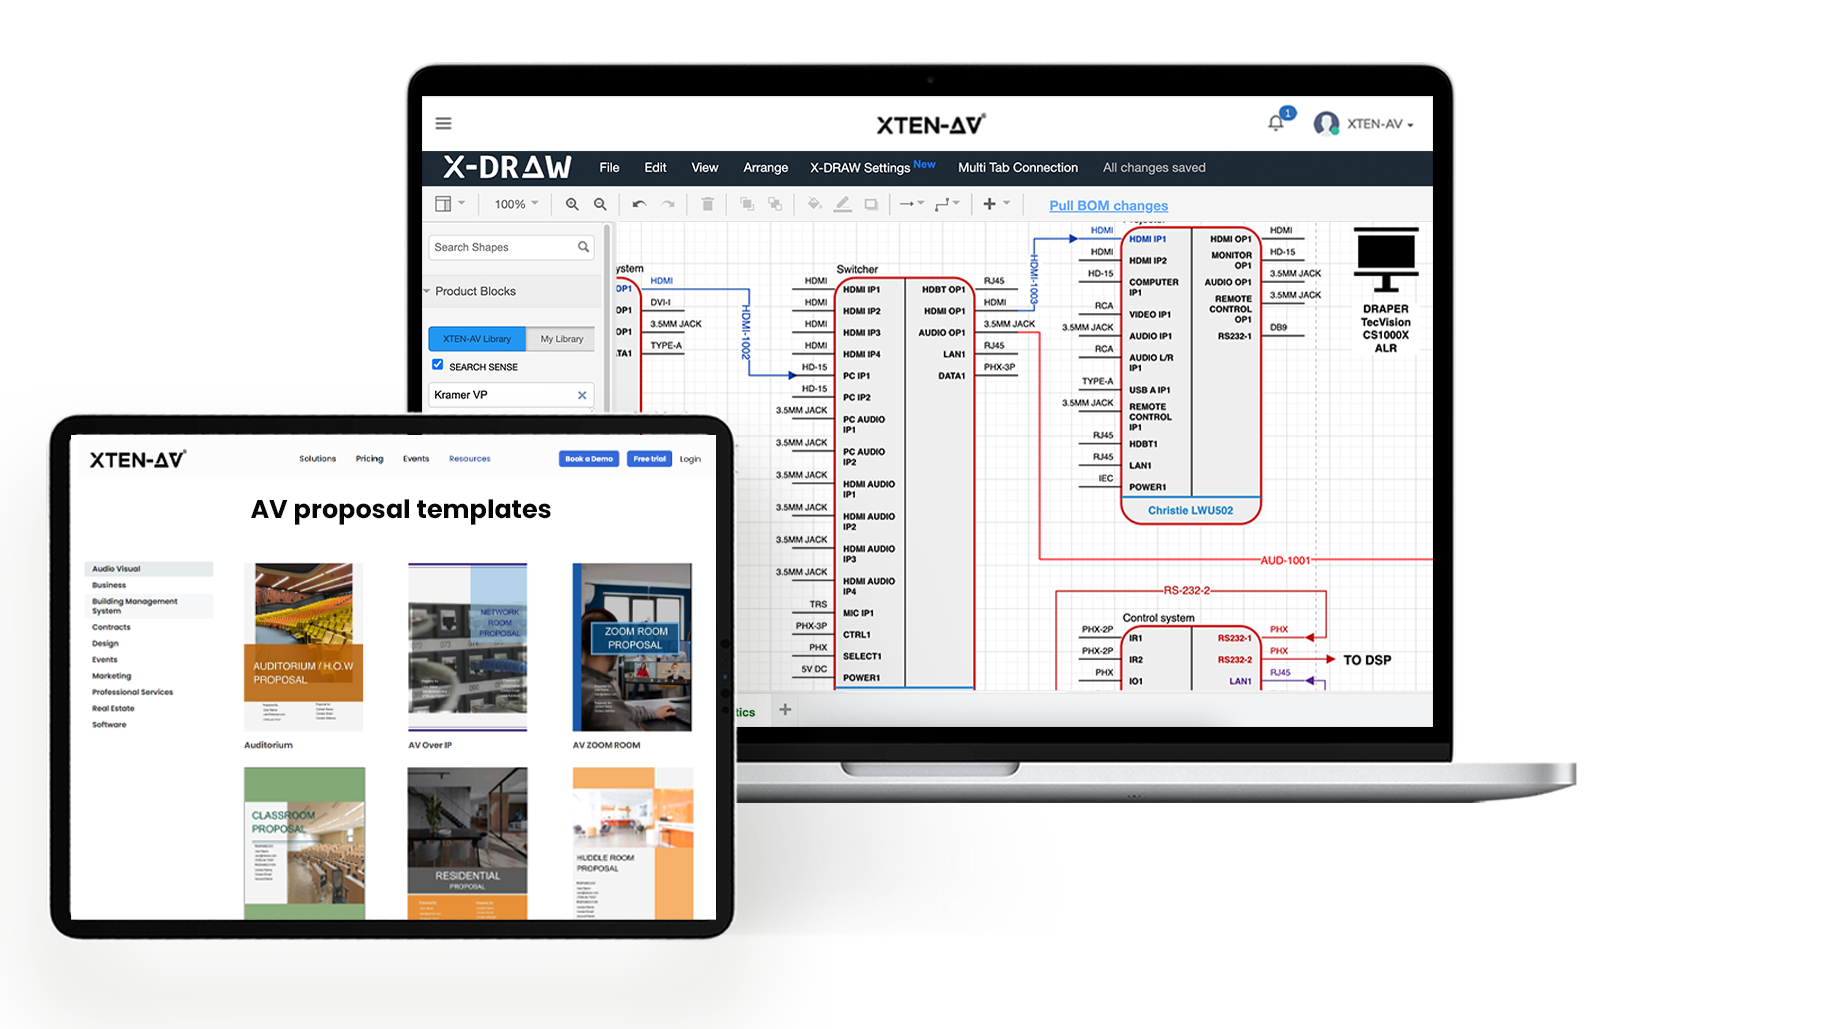
To capture these details clearly, many integrators use security system design tools like XTEN-AV’s X-DRAW. You can drag icons onto the floorplan, sketch over them, and create notes to highlight coverage areas or stakeholder requirements so that nothing gets lost after the walkthrough.
Pro tip: Involving stakeholders during the site walk makes it easier to build trust and secure buy-in for your recommendations.
5. On-Site Walkthrough & Measurements
Once on-site, it is time to validate the plans actually against reality. Never assume the floor plan is perfect. Measure rooms, door width, ceiling height, or corridor using a laser or tape. Select a good laser distance meter. Record each measurement with an acceptable tolerance, for example ±2 cm, to account for minor deviations. Always double-check key distances to ensure accuracy. Update your drawings as you go so your survey reflects what’s actually there.
Pay attention to environmental factors. Lighting conditions, reflecting, cluttering, or large obstacles can impair camera performance or sensor detection. Record these sources of interference along with other important environmental factors for outdoor or temperature-sensitive installations (heat, humidity, or exposure to sunlight).
Take visuals along the way! Take clear photos of entry points, racks, and mounting areas, and label them immediately. Linking these images to your floor plan adds context and reduces errors during design or installation.
Record any anomalies such as unexpected wiring paths, locked rooms, or potential hazards. These details will affect equipment placement and installation planning.
Pro Tip: Be slow and methodical. You can miss crucial details by rushing; spend enough time ensuring the accuracy of every measurement and observation.
6. Design Device Placement & Coverage
Once you’ve gathered your measurements and notes, the next step in the security site survey is translating that data into a placement plan.
Start by sketching coverage diagrams for cameras on the facility floor plan. Mark their fields of view carefully, ensuring that all critical areas are visible without creating blind spots or heavy overlaps that could waste money. For instance, a 4MP camera recording at 1080p-equivalent resolution should aim for 50 pixels per foot at about 10 meters to record face details most accurately. XTEN-AV’s X-DRAW can be used here to upload digital floorplans and overlay FOV cones, making it easier to refine angles and coverage in real time.
For access control surveys, map card readers and controllers according to the door swing and lock hardware. Consider the type of frame, wiring routes, and power needs so installation doesn’t run into surprises. In the IT or equipment room, identify where servers, switches, or control panels should sit, keeping cable runs efficient and compliant with site survey planning standards.
Watch out for mounting details. Now, a good installer would never neglect mounting details.Take mounting into account. The installation height of dome cameras usually is between 8 and 12 feet, while ID cameras, depending on local regulations, usually sit between 6 and 8 feet. Consider mounting accessories such as brackets, housings, or enclosures, whether the sensor is a ceiling dome, a wall mount, or a pole mount. The existence of visual obstructions such as windows or reflective surfaces can severely degrade the effectiveness of the video surveillance, and intrusion detection coverage has to map out a clear perimeter.
7. Account for Environmental & Regulatory Constraints
During any physical security site survey, one must look beyond device placement and think about factors that might foul up installation and certification. Structural impediments are often the biggest surprises. A heavy concrete wall concealed steel beams, or even toughened glass may just interfere with wireless access control or cramp the field view of a camera. Always inspect the ceiling, walls, and hidden spaces before deciding on your security design.
Environmental considerations count as well. Incessant light of a particular wavelength can damage video surveillance, while radio issuance, magnetic fields, or high-voltage lines nearby can cause interferes. With outdoor areas, another set of threats looms high: temperature difference, humidity, or unfavorable reflective surfaces for intrusion detection coverage.
Be sure to run checks for all applicable standards during your assessment: NFPA 72 for emergency communication systems; UL 2572 for cloud/EVAC integration; EN 54-16 for Europe standard fire alarm systems.
Compliance should never be bitten into a corner. Right security site assessments cover fire and safety codes, privacy laws, and industry-specific mandates for the local area.
A proper security site assessment includes checking local fire and safety codes, privacy rules, and any industry-specific mandates. For example, cameras must avoid sensitive zones like restrooms, and access control surveys must verify that exit doors meet egress requirements.
Make sure the survey itself is carried out safely. Bring the right gear if you are entering construction areas, and never step into restricted zones without clearance. As you log your findings, keep these environmental and regulatory notes in the same site survey checklist you use for devices. This way, you capture the risks early and avoid running into redesigns or compliance issues later.
8. Develop Budget Estimates & Bill of Materials
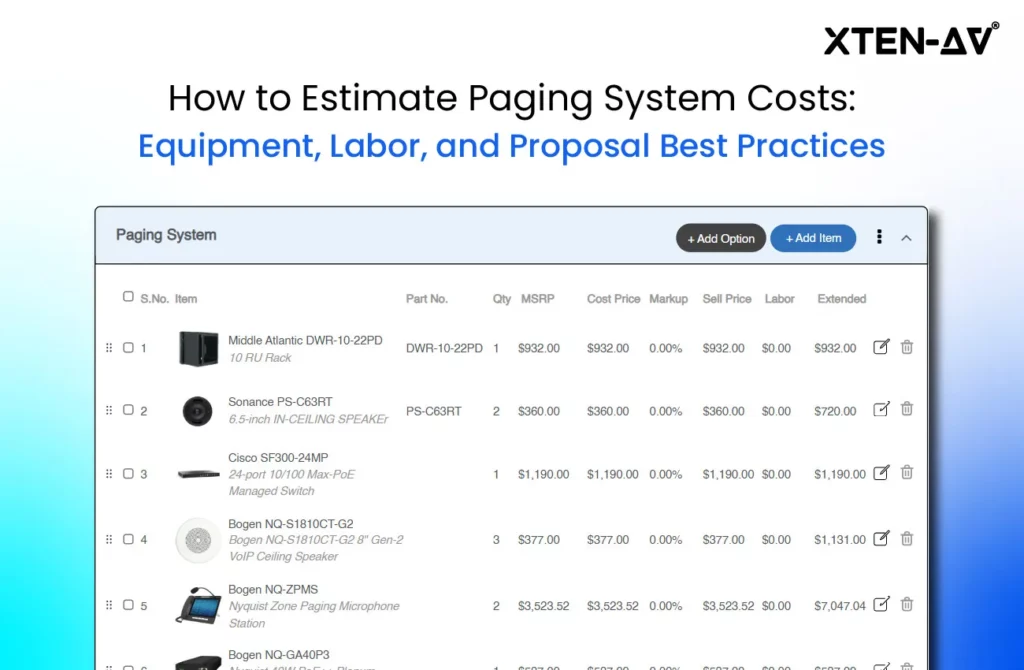
Once you finish your security site survey, the next thing you must do is drawing up a budget based on your findings. Start by producing a fine detailed Bill of Materials that lists every item and accessory identified throughout the walkthrough. Cameras, access control panels, intrusion sensors, mounts and cables, power supplies, and all special hardware-all must be included. The more precise you are regarding models or quantities, the easier and smoother the next stage of system design will be.
To save time, use estimation tools that can generate and format proposals quickly. With XTEN-AV’s X-DOC, for example, you can auto-populate a BOM while planning and convert it into a professional proposal with a few clicks. You can also start from a ready-to-use resource like XTEN-AV’s Security Proposal Template, which ensures nothing important gets left out. You can use these as your go-to security survey tools.
Always review budget trade-offs with the client. If costs turn out to be above expectation, the project then is broken into phases, tackling first the high-risk areas. For a good accurate budget, include labor hours from 2 to 4 hours per indoor camera, while this increases to anywhere between 4 and 8 for the more tricky outdoor or pole hiding if you will. Add 10 to 20 percent contingency and plan for a lifecycle-replacement window of 5-7 years so that surprises are avoided, with the system remaining operational over the years.
Pro Tip: Make sure you do not leave out accessories or cable runs. These little things cause all sorts of budget surprises and can well be the difference between earning or losing a profit on a given project!
9. Collaborate with Team, Vendors & Stakeholders
A security site survey doesn’t end once you’ve captured data and drafted layouts. The real value comes when you validate those findings with others. Begin by holding an internal review with your project team. Security Engineers and project managers can spot issues you may have missed, such as cabling routes that conflict with existing infrastructure or mounting requirements that need reinforcement.
Next, consult with vendors. Camera and alarm manufacturers often have insight into product specifications that can improve your design. Sharing a digital floorplan with them allows you to confirm field of view, device compatibility, or accessories needed. Use a short vendor checklist: confirm mount compatibility, lens selection, warranty, lead times, and firmware support.
For thorough validation, follow a three-step process: review datasheets, conduct sample mounting, and perform on-site verification. These steps strengthen your system design and ensure your bill of materials is accurate.
Finally, sit down with the client. Walk them through the proposed solutions, confirm details like door access requirements, and explain trade-offs in plain terms. Cloud-based platforms such as X-DRAW and X-DOC make this easy, since they let multiple parties view and refine the plan in real time rather than relying on static PDFs.
Pro Tip: Invite a vendor security engineer to review the digital plan with the client present. It shows that your design has been vetted by multiple experts and builds immediate trust.
10. Prepare Professional Deliverables & Next Steps
Once the survey work is complete, your job shifts to packaging the results into a professional deliverable. A strong security site survey report typically includes a cover page, an executive summary of objectives, annotated floor plans, key photos, a device inventory, the draft Bill of Materials, and any relevant vendor feedback. A well-documented physical security site survey report ensures all site survey steps are transparent and actionable for both clients and team members.
Presentation matters. Clean, well-labeled visuals make your report look like it was built in CAD, even if you used more intuitive tools. Add a title block, client logo, and a legend of symbols to give the report polish and credibility. Consistent formatting across the document helps position you as a trusted consultant.
It also helps to standardize how files are packaged and named. Use clear, versioned file names such as “Project_Client_Site_Survey_v1.pdf,” “Floorplan_Scaled.dwg,” or “Inventory.csv.” This small step improves collaboration and makes updates easier to track later.
This deliverable also serves as a digital as built for lifecycle management. By centralizing notes, images, and device placements, you give your client a reference point that supports future maintenance, system design updates, or compliance audits. Include a short maintenance schedule in the report, noting a yearly equipment review, quarterly firmware updates, and configuration backups after major system changes to keep everything reliable and up to date.
Before moving into full security system design or proposals, highlight next steps for the client. You can even insert a callout to download a Security Site Survey Checklist. It is an effective way to guide them further and capture interest in advanced tools like XTEN-AV’s proposal workflows.
Pro Tip: Share portions of the findings with your client during the process so the final report confirms expectations rather than delivering surprises.
The all-in-one solution for your AV needs
Transform your audio-visual experience with XTEN-AV.
No Credit Card required
Security System Design Mastery + Winning Proposals = 10x Productivity!
- ✔ Automatic Cable Labeling & Styling
- ✔100+ Free Proposal Templates
- ✔ Upload & Create Floor Plans
- ✔1.5M Products from 5200 Brands
- ✔ AI-powered ‘Search Sense'
- ✔Legally Binding Digital Signatures
Conclusion
A security site survey is more than a checklist. Following proper site survey steps throughout the security site assessment guarantees accurate coverage, reduces blind spots, and strengthens client confidence. From gathering client requirements to preparing professional deliverables, every step adds clarity and prevents costly mistakes. When done well, the survey produces detailed floor plans, annotated photos, and a bill of materials that guide the entire project lifecycle. This document also serves as the digital as-built record, supporting future upgrades and maintenance.
Using the right tools makes the process faster and more reliable. Cloud platforms with features like X-DRAW and XTEN-AV’s X-DOC turn survey data into drawings, bills of materials, and proposals with minimal effort. Integrators save hours, avoid missing accessories, and build confidence with clients.
If you want to streamline your workflow and deliver accurate security site survey reports, now is the time to act. Start your 15-day free trial with XTEN-AV today.
FAQ's
A security site survey is a structured assessment of a building or facility. It documents client needs, checks current systems, and measures the physical environment. You need it to ensure the security system design fits real conditions. Without a survey, you risk coverage gaps, missed accessories, or redesigns later. A detailed site survey is the foundation of every reliable and cost-effective security project.
Preparation helps the survey run smoothly. Start by defining project scope and collecting existing floor plans or satellite images. List questions you want answered and decide which stakeholders should be present, such as facility staff or IT. Carry a checklist to capture devices, cabling, and environmental details. With a bit of planning in advance, your security site survey will be faster and more accurate.
Record details that affect design. Capture scaled floor plans, room photos, and the location of cameras, sensors, and cabling. Document ceiling heights, doorway widths, and power availability. Pay attention to environmental factors like lighting and obstructions. Note client requirements or unique features such as restricted zones or fences. The goal is to collect complete, accurate data so your security site survey supports a reliable system design.
Digital tools can make your security site survey faster and more precise. Use a tablet with site survey software, a good camera, and a laser distance meter. Platforms like XTEN-AV’s X-DRAW let you place device icons directly onto digital floor plans as you walk the site. Tools such as XTEN-AV X-DOC can then use this data to generate a bill of materials and proposal automatically.
Start by measuring mounting height and viewing angle for each camera. Plot its field of view on your floor plan to visualize coverage. Digital tools or coverage calculators can speed up this process and help confirm there are no blind spots. XTEN-AV provides templates to mark camera ranges directly on drawings. On-site verification is essential to ensure your security camera coverage matches the real environment.
A successful security site survey includes both technical staff and decision-makers. Typically, the security integrator or engineer runs the survey with input from a facility or security manager. IT staff may be needed to check network or power requirements. Vendors can also provide device-specific advice. Having the client present is important, as it builds trust, addresses concerns directly, and helps approve the security system design faster.
One major mistake is showing up unprepared without floor plans or a clear checklist. Relying only on paper notes instead of digital tools can lead to missed details. Never assume client needs, confirm each requirement on-site. Many security integrators also overlook accessories like mounts or cabling, which impacts profitability. Document every step carefully. Avoiding these mistakes ensures your security site survey produces a complete and accurate result.
Survey length depends on site size and complexity. A small office may take only a few hours, while larger facilities with multiple floors may require a full day or longer. As a rough guide, allow 2 to 4 hours for every 10,000 square feet. Although it takes time, a thorough security site survey prevents redesigns later and ensures your proposal reflects real-world conditions accurately.
After the survey, compile findings into a clear site survey report. Update your floor plan, attach photos, and finalize the bill of materials with correct quantities and pricing. Add notes or vendor recommendations where relevant. Share the report with your team and the client to validate the results. This becomes the “digital as-built” record, supporting both the current security project and future upgrades.
Explore more by topic

AV Design Mastery + Winning Proposals = 10x Productivity!
- Automatic Cable Labeling & Styling
- 100+ Free Proposal Templates
- Upload & Create Floor Plans
- 1.5M Products from 5200 Brands
- AI-powered ‘Search Sense'
- Legally Binding Digital Signatures
No Credit Card Required
Related Blogs

-

- Posted by Sahil Dhingra
Audio Visual Top 5 Project Management Software CRM & Invoicing Tools for...
-
- Posted by Sahil Dhingra
Audio Visual Paging and PA System Cost Estimation Guide Sahil Dhingra Published...

-
- Posted by Sahil Dhingra
Audio Visual Security Site Survey for System Design & Integration Checklist Sahil...