Rack Elevation Diagram: Plan AV Racks Right

Rack Elevation Diagram: Plan AV Racks Right

Author Image

Olivia Rae

Published 07 August 2025

Rack Elevation Diagram to Plan AV Racks
Table Of Content

One of the biggest mistakes AV professionals and system integrators make is installing AV racks without first creating a Rack Elevation Diagram. It might seem like a minor oversight initially, but this can quickly lead to misaligned components, poor weight distribution, ventilation issues, and tangled cabling. However, without a structured plan, cables would become messy and make it difficult to troubleshoot, maintain, or upgrade a system in the long run.

Well, the question is, how you can avoid these? Creating a rack elevation diagram takes some of the guesswork out of your rack-building project and can ensure that every piece of equipment is in its correct slot, proper airflow is maintained for each device, and equipment is easily accessible.

In this blog, we’ll explain everything you need to know about rack elevation diagrams, why they’re essential, and how to create one effectively using AV Design tools like XTEN-AV.

The all-in-one solution for your AV needs

Transform your audio-visual experience with XTEN-AV.

No Credit Card required

What is a Rack Elevation Diagram?

A rack elevation diagram is a detailed, scaled visual representation of an equipment layout within an AV rack. It displays the front and a rare view of the devices inside the rack, showing how they are organized both vertically and horizontally. It serves as a visual blueprint, providing a clear, structured observation of the AV rack. It keeps every component in the right place, maintains proper ventilation, and allows equipment to remain accessible.

These diagrams help professionals monitor and control how much space, power, and weight is being used within a rack, making it easier to organize equipment efficiently by providing a clear visual representation of available rack space. This helps in planning future installations, avoiding overcrowding, and ensuring proper airflow and cable management.

Why Is a Rack Elevation Diagram Essential for AV Systems?

Why is a rack elevation diagram more important in AV systems? Because it plays an important role in three key areas in audio-visual rack management, i.e., planning, installation, and maintenance. So, here are the Top reasons Why these diagrams are a must for AV integration:

How Do Rack Elevation Diagrams Increase Efficiency?

Rack elevation diagrams are designed to maximize the use of space while ensuring that every rack unit is used appropriately to help avoid wasted space or poor organization. Technicians can pre-plan where each component will be positioned before installation. Proper planning allows for the avoidance of overloading the rack, which can result in poor ventilation and difficult maintenance. With well-organized equipment, accessing, maintaining, or upgrading becomes easier for the entire setup.

How Do Rack Elevation Diagrams Help Reduce Errors?

When you have a well-planned rack layout, there will be less room for mistakes like equipment being placed in the wrong slots or getting the routing of cables mismatched, and thus, the whole installation process will go smoothly without delays and system failures. The AV rack design helps plan for proper power distribution and cooling, preventing issues like overloading circuits or inadequate ventilation, which could cause system failures.

How Do Rack Elevation Diagrams Support Scalability for Future Upgrades?

Rack elevation diagrams are also used when adding new equipment or upgrading an existing AV system to help ensure that expansion is done in a more organized and efficient manner. They represent available space and detail how the current setup is structured to make it easier to integrate new devices. This makes future upgrades easy without downtime or interruptions.

How Do Rack Elevation Diagrams Improve Cable Management?

Messy, disorganized cables can slow operations by making troubleshooting, maintenance, or system upgrades more difficult. Cables that are tangled or improperly routed create risks, including overheating that may lead to tripping hazards or even electrical failures. Well-organized cables allow for much better airflow, thus avoiding overheating; it also makes rack management and maintenance much simpler.

How Do Rack Elevation Diagrams Simplify Troubleshooting?

When network problems occur, including equipment failure, connectivity problems, or performance lags, technicians can refer to the rack elevation diagram to help them quickly identify components to troubleshoot instead of guessing or manually tracing cables and devices. The diagram provides a visual representation of where each device is placed and how it is connected. This accelerates troubleshooting, which reduces downtime and increases the efficiency of repairs.

What Are the Key Elements of a Rack Elevation Diagram?

The key elements of a rack elevation diagram are the components that help create a clear and accurate visual representation and ensure the diagram effectively represents the physical layout and configuration of the equipment within a rack. These elements include:

  • Cable Routing Paths:  Cable routing paths within an AV rack are important for maintaining an efficient, organized, and reliable audio-visual system. Proper rack cable management reduces tangling, improves airflow, and prevents signal interference. 
  • Rack Dimensions: It showcases the physical size of the AV rack, which includes the height, width, and depth. Proper fitting of the rack dimension ensures that AV devices, servers, and other components fit correctly in the rack and helps with space utilization, which eventually prevents overcrowding and helps with proper ventilation. 
  • Equipment Placement: It is important to ensure that AV devices are positioned correctly and strategically inside the rack. Poor placement can lead to imbalanced weight distribution, overheating, or power issues, affecting the system’s reliability. Well-organized equipment makes it easier to access, troubleshoot, and upgrade without disrupting other components.
  • Power Distribution Units (PDUs): It is designed to distribute electrical power smoothly within the AV rack. This ensures that all equipment, such as amplifiers, processors, and servers, receive the necessary power for operation.
  • Cooling Considerations:  Keeping AV equipment cool is essential to ensure the performance and longevity of audio-visual equipment. Managing airflow and cooling mechanisms helps avoid excessive heat buildup, which can damage components, preventing unexpected failures or slowdowns.
AI Assisted CAD Design for Complex AV Systems by XTEN-AV XAVIA AI AV CAD Design Software

How Is a Rack Elevation Diagram Created?

  • Here are the steps to create a Rack Elevation Diagram: 

    Step1: Define the Reason and Need

    You need to specify the general AV system requirements, such as the type of space, like a meeting room, home theater, etc. Not only this, but it also records dimensions, size, weight, and any special equipment needs.

    Step2: Measure and Plan the Space in Rack

    Then comes the part where you need to do some rack unit calculations and ensure that the rack you are opting for concisely fits all the equipment, along with some space for future updation.

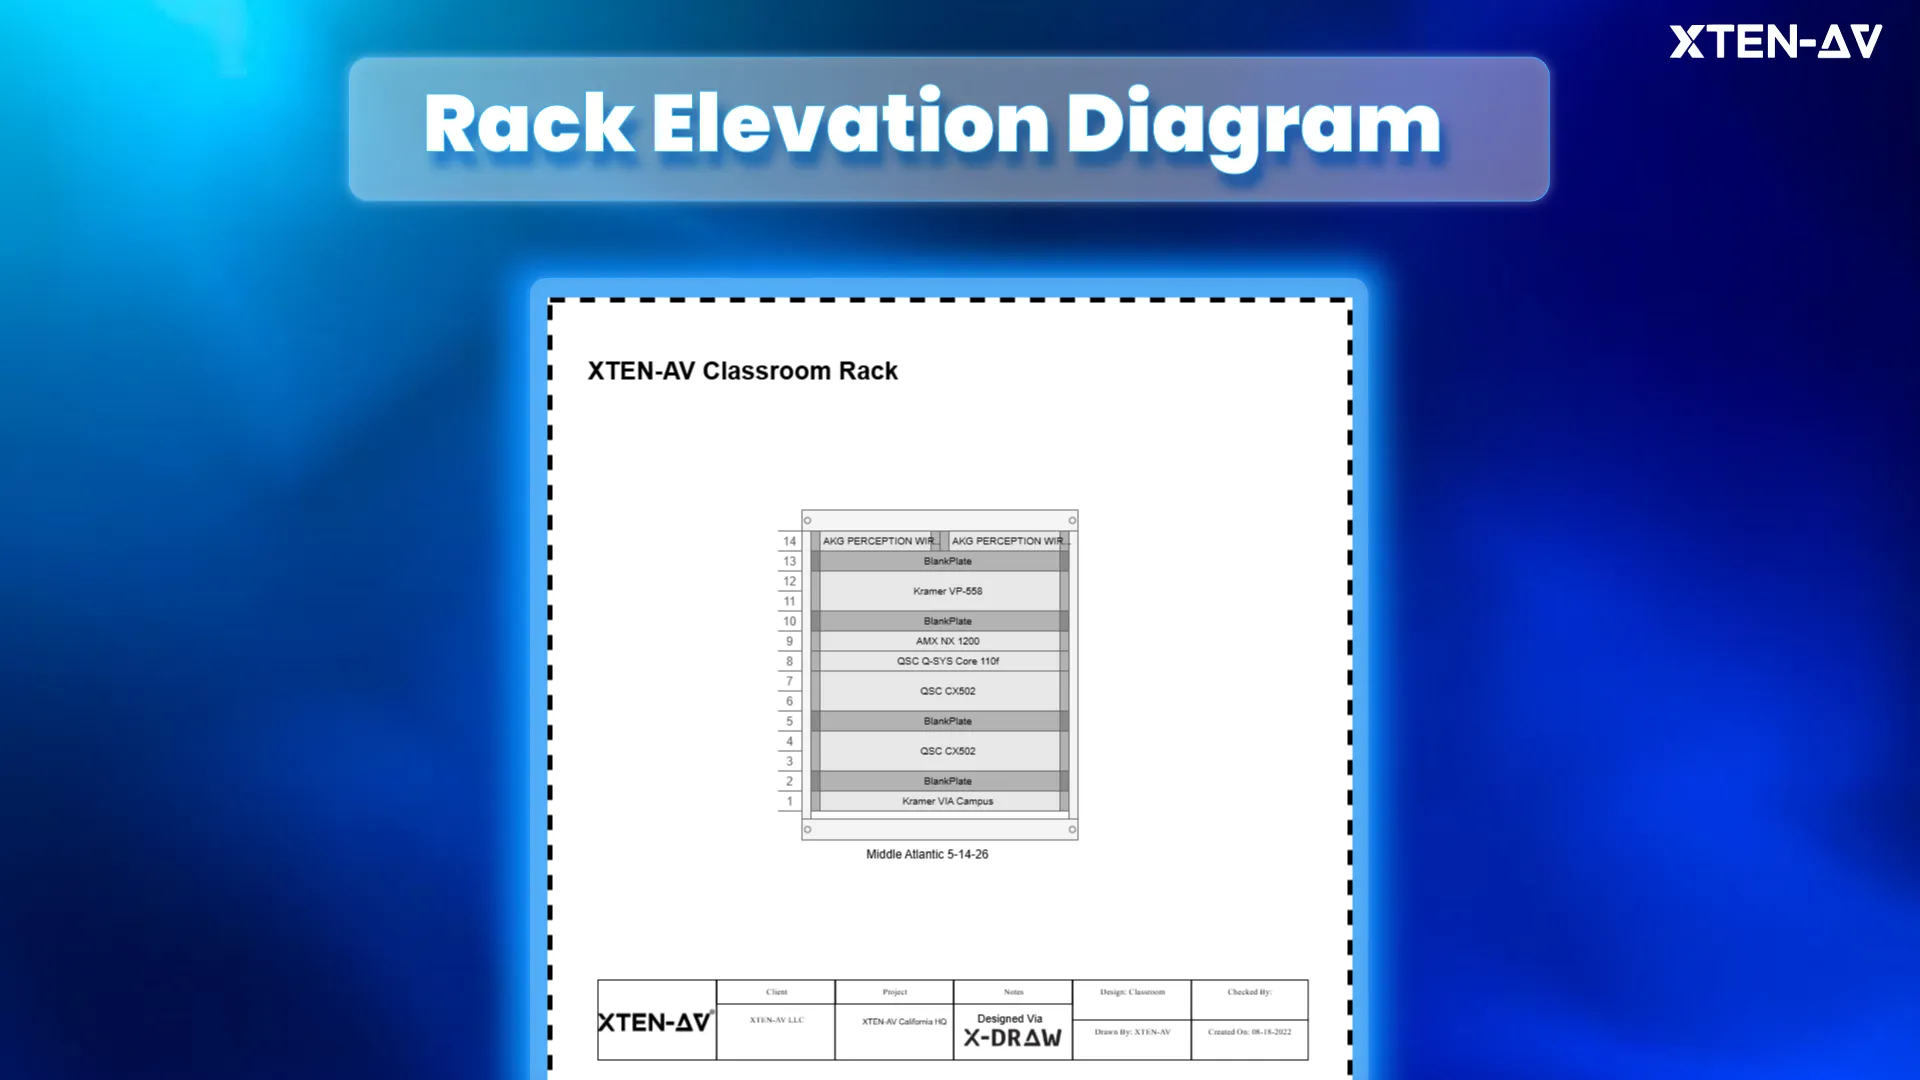
    Step3: Design the Rack Layout

    Your equipment should be organized properly; for instance, if any device is heating up, it should be put on top so that airflow can take place properly. Similarly, proper cable management helps to prevent tangling and interference.

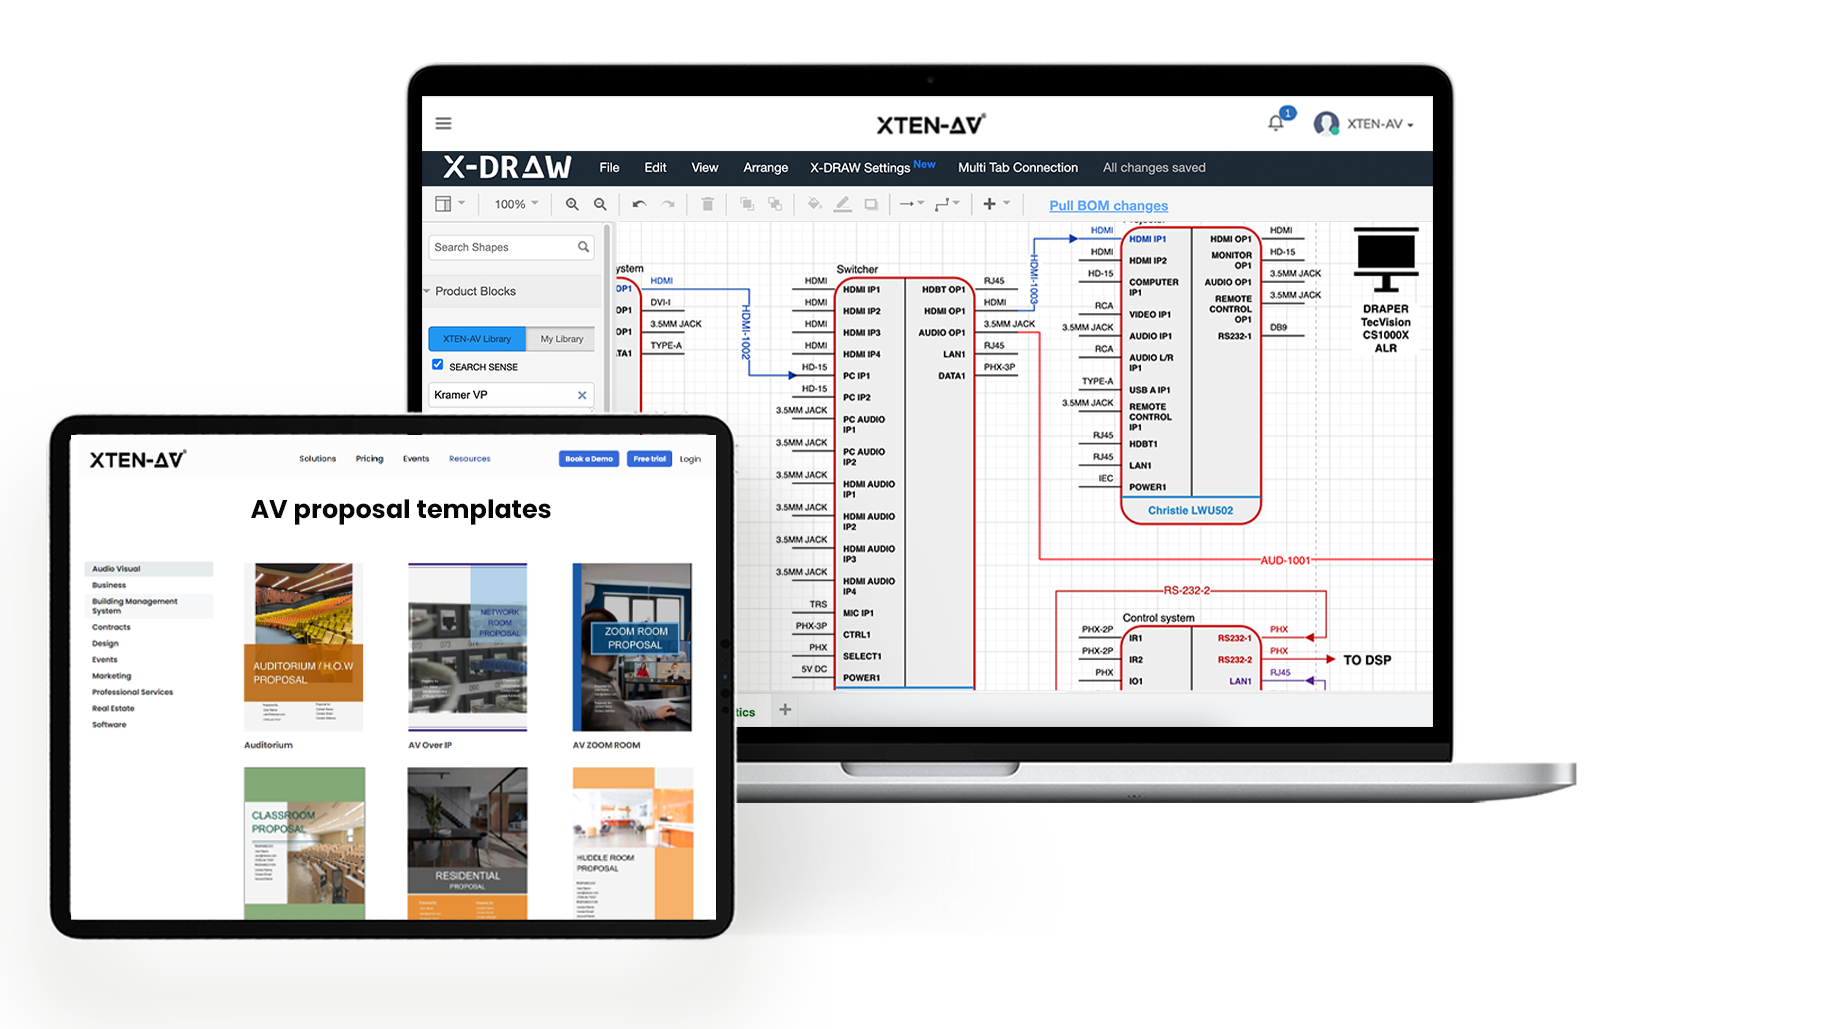
    To ensure that your rack layout is properly designed, you can choose some of the best design tools, like XTEN-AV’s rack diagram tool, which is specifically designed with automation features like extensive product database and heat adjustment algorithms to make sure it fulfills the user’s requirement. 

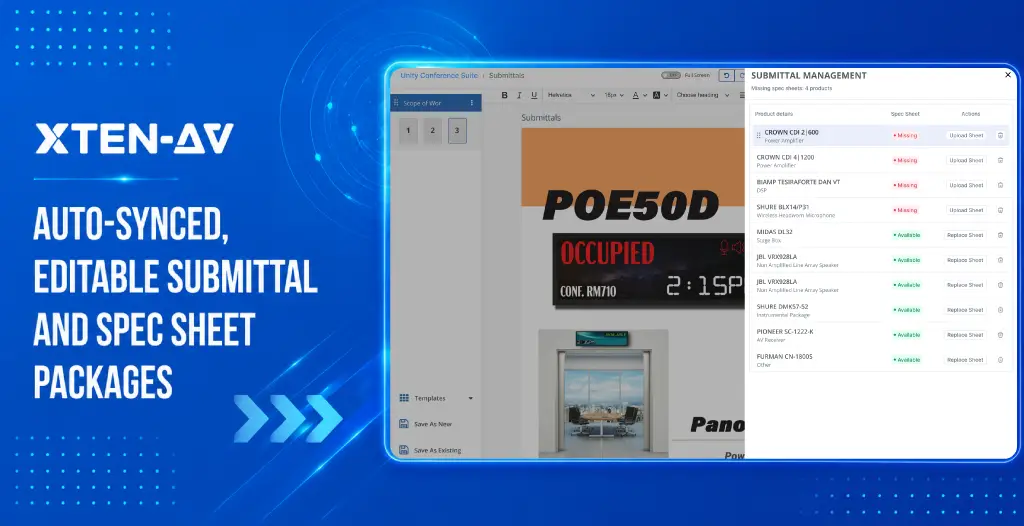
    Step4: Review, Optimize and Share the Design

    The final step is ensuring your rack layout meets all requirements, such as proper airflow and cooling, cable management, and future scalability for your equipment. Once you create this layout, share it with your team to help guide them in a consistent approach during setup and service.

Why Use XTEN-AV Diagramming Software for Rack Elevation Diagrams?

XTEN-AV is the best av specific rack elevation diagram software for the following reasons:

Automated Rack Layout: It optimally organizes equipment in an AV rack according to heat emission, weight distribution, and more, ensuring a balanced and efficient AV setup.

Cable Management: The system comes with automatic cable labeling and styling features for organized system installation. This minimizes errors and simplifies the installation.

Extensive Product Database: It contains a huge product database of 1.5 M products across 5200+ brands. More than that, it has symbols, icons, and equipment based on AVIXA standards, providing design precision.

DISCAS Compatibility: XTEN-AV’s tools are designed to comply with AVIXA’s Display Image Size for 2D Content in Audiovisual Systems (DISCAS) standards, ensuring that screen size calculations and display placements meet industry guidelines for optimal viewing experiences. 

Import Existing Rack Diagram: It enables users to import and integrate existing rack layouts generated in other platforms. This feature facilitates a smooth transition and enables further modifications or enhancements using XTEN-AV’s Rack Elevation Diagram tool.

The all-in-one solution for your AV needs

Transform your audio-visual experience with XTEN-AV.

No Credit Card required

AV Design Mastery + Winning Proposals = 10x Productivity!

  • Automatic Cable Labeling & Styling
  • 100+ Free Proposal Templates
  • Upload & Create Floor Plans
  • 1.5M Products from 5200 Brands
  • AI-powered ‘Search Sense'
  • Legally Binding Digital Signatures
Laptop Mockup

Conclusion

A properly created rack elevation diagram is a tool that will help increase both efficiency and organization as well as scalability in the long run AV installation. By meticulously designing equipment layouts, power allocation, cooling, and cabling, AV experts can significantly reduce installation mistakes, expedite maintenance, and prepare for future technology advancements.

Gone are the days of dealing with messy cables, worrying about overheating issues, or making last-minute changes; use automation tools such as XTEN-AV’s Rack Diagram Tool to create accurate, industry standards-based rack layouts in mere seconds, saving you time, resources, and efforts.

Ready to optimize your AV rack design? Try XTEN-AV’s Rack Diagram Tool today and experience seamless AV system planning!

Explore more by topic

AV Design Mastery + Winning Proposals = 10x Productivity!

No Credit Card Required

Related Blogs
Rack Elevation Diagram to Plan AV Racks
  • Olivia Rae
  • Posted by Olivia Rae
August 7, 2025

Audio Visual Rack Elevation Diagram: Plan AV Racks Right Olivia Rae Published...

AI AV Resource Allocation Management for AV Projects
  • Olivia Rae
  • Posted by Olivia Rae
July 21, 2025

Audio Visual How AV Project Managers Can Leverage AI to Allocate Resources...

Traditional AV Design Software Vs AI Powered
  • Vibhav Singh
  • Posted by Vibhav Singh
July 18, 2025

Audio Visual Traditional AV Design Software Vs AI Powered Design Tool Vibhav...

Olivia Rae
Olivia Rae
A Design Consultant at XTEN‑AV. I make easy drawings that show where speakers, screens, and cables go in a room. I pick the right equipment and turn ideas into simple plans. I enjoy working with my team and learning new things every day. Let’s connect and share ideas!

Leave a Reply

Your email address will not be published. Required fields are marked *

This website stores cookies on your computer. Cookie Policy

Meet us at Booth #F37 at Integrate 2025

X