


Get Immersed In Sound:
Top Tips For Ceiling Speaker Placement
Are you looking to install ceiling speakers but have no clue where to begin with? Don’t worry this beginner-to-pro guide will help you understand all aspects of ceiling speaker placement. There are various tools in the market that you can use to calculate the placement but XTEN-AV has one of the most easy-to-use tools available. Before you start worrying about the cost and various types of fees applied on different platforms this one is absolutely free to use. So, what exactly is a ceiling speaker placement calculator? It is an online tool that helps you determine the optimal placement of your ceiling speakers based on the size and layout of your room.
By simply inputting the dimensions of your room and other relevant information, such as the speaker type and listening area, the calculator will generate a placement diagram that shows you exactly where to install your speakers for the best sound quality.
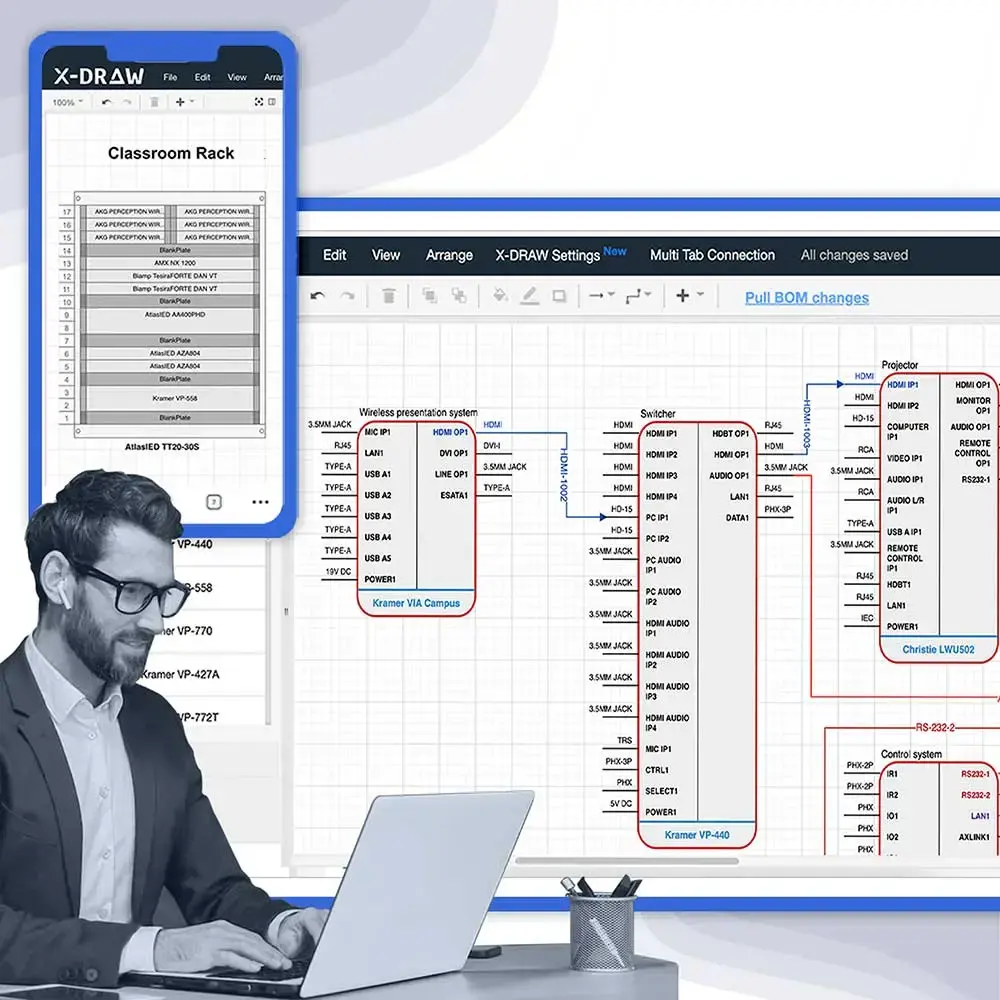
Automate Ceiling Speaker Layouts and 10 types of AV drawings and documents with XTEN-AV
The all-in-one solution for your AV needs
Transform your audio-visual experience with XTEN-AV.
No Credit Card required

AV Design Mastery + Winning Proposals = 10x Productivity!
- Automatic Ceiling Speaker Layout
- 100+ Free Proposal Templates
- Upload & Create Floor Plans
- 1.5M Products from 5200 Brands
- AI-powered ‘Search Sense'
- Legally Binding Digital Signatures
No Credit Card Required
Factors To Consider For Ceiling Speaker Placement
Ceiling speakers are a long-term commitment, it’s not easy to keep them changing frequently. So, we would suggest that you analyze 360° about the factors to consider for ceiling speaker placements. Your AV integrator must make you understand various aspects of ceiling speakers like, what speakers may be best, where to place them, number of speakers needed.
You can also use the XTEN-AV ceiling speaker layout tool to analyze the correct placement of speakers according to your room size. Let’s get digging into the factor to consider for ceiling speaker placement.
Number of Speakers Needed
The number of ceiling speakers you need to install depends on the size of your room and the quality of audio that you desire. Ideally, you should have at least two ceiling speakers for stereo. Sound while on the other hand if you want a surround sound experience you will definitely require more speakers. A professional AV integrator will be your go-to person to get the best experience.
Space Considerations
Your room layout is a very important factor for designing the placement of your ceiling speakers. You need to consider the ceiling height, the distance between the speakers, and the position of the object that is already in the room, such as furniture, HVAC vents, lighting fixtures, etc.
But why do all this manually and waste your time? When you can just use XTEN-AV’s ceiling speaker layout calculator and get a customized design within seconds. Sounds amazing right? Give it a try, it’s free to use
Position of the Speakers
If you’re unwilling to compromise on the sound quality, positioning the speakers right is a key point to note. Ideally, it is suggested that the speakers are placed at an equal distance from the listening area and should be at an angle that faces the listener. Another factor to consider is height, as it has a great effect on the dispersion of sound.
XTEN-AV’s free-to-use layout tool will also tell you how and where to position the speakers for optimal sound dispersion and experience.
Type of Speakers Being Used
The type of speakers you choose affects a lot of things, such as the placement, the audio quality, and much more. There are majorly two types of ceiling speakers In-ceiling Speakers and On-ceiling Speakers.
In-ceiling Speakers: These speakers are mounted flush with the ceiling. They also provide an aesthetic touch and look better in your home. They cannot be adjusted after the placement is done, so they have to be installed very carefully.
On-ceiling Speakers: They are mounted on a bracket that extends from that ceiling, on ceiling speakers might not look so good but they provide better surrounding sounds, as you can adjust them according to the listener.
Budget Correctly for In-Ceiling Speakers
In-ceiling speakers can vary in price depending on the brand, features, and sound quality. It is important to budget correctly for your speakers to ensure that you get the best possible sound quality for your money. Cheaper speakers may not have the same sound quality or durability as more expensive models, so it is important to choose wisely.
The Role Of A Ceiling Speaker Placement Calculator

Are you planning to install ceiling speakers in your home or office but don’t know where to start? Don’t worry, because XTEN-AV’s ceiling speaker placement calculator can make the process much easier for you!
Using a ceiling speaker placement calculator has several benefits. First and foremost, it ensures that you get the most out of your ceiling speakers by optimizing their placement. That simply means you will be able to enjoy a high-quality audio experience while having a clear sound all over the room. If you’re looking to save a huge chunk on cost then XTEN-AV’s calculator will be a great choice to move forward with. Using tools will always give you accurate results according to your demands, leaving no chance of costly mistakes and small human errors.
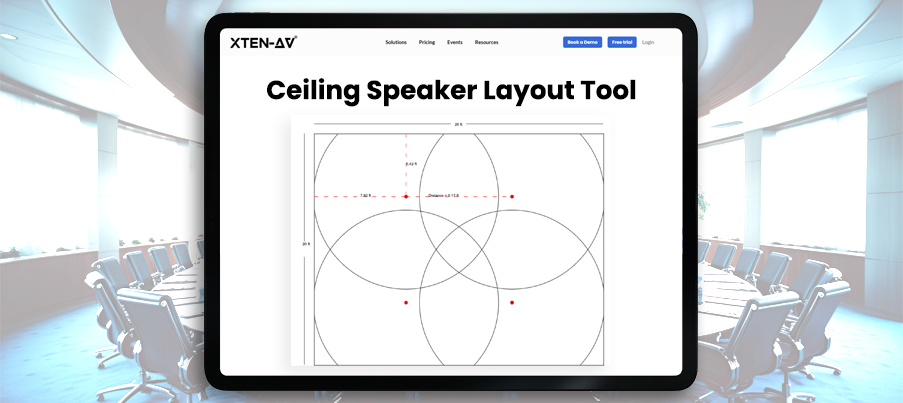
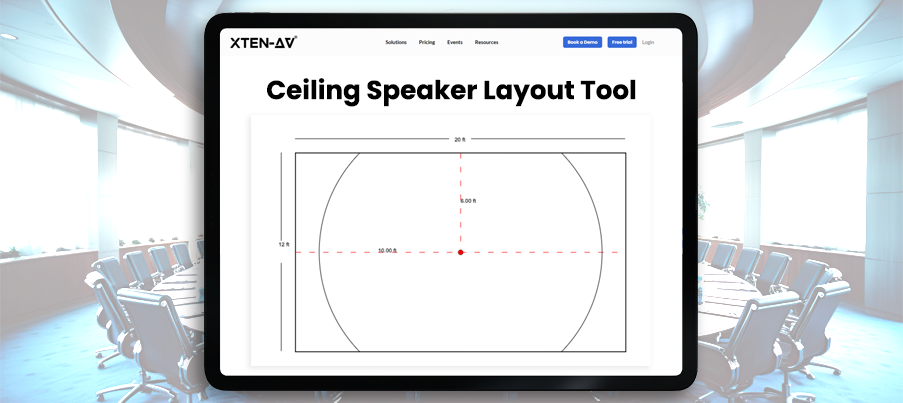
There are several online ceiling speaker placement calculators available, each with its own unique features and capabilities. But this is brought to you by XTEN-AV, its ceiling speaker layout tool allows you to input the dimensions and shape of your room, as well as the type and number of speakers you plan to use. It then generates a 3D diagram that shows you exactly where to install each speaker for optimal sound quality.
Why Migrating To XTEN-AV Ceiling Speaker Layout And Calculator Can Be Beneficial To Your Business?
XTEN-AV’s Ceiling Speaker Layout and Calculator offers a unique solution that combines comprehensive AV brand compatibility, quick operation, accuracy, adherence to industry standards, and cost-effectiveness. This article explores the key benefits of migrating to XTEN-AV’s tool and how it can positively impact your business.
speaker placement for surround sound
speaker placement for surround sound
speaker placement for surround sound
speaker positioning for surround sound
speaker positioning for surround sound
speaker positioning for surround sound
Unparalleled AV Brand Compatibility
Regardless of the brands you work with or the projects you undertake, you can trust XTEN-AV to provide you with accurate and relevant information. By eliminating the need to switch between multiple tools for different brands, XTEN-AV saves valuable time and enhances your efficiency.
Speed and Efficiency
The intuitive interface allows you to quickly input project specifications, and the tool generates layouts and drawings automatically. By automating these processes, XTEN-AV significantly reduces the time required for manual calculations and design iterations, enabling you to focus on other critical aspects of your projects.
Accurate and Error-Free Design
Developed by AV professionals who understand the complexities and intricacies of AV system design. This ensures that the tool is accurate and free from errors, providing you with reliable results. By eliminating the possibility of human errors, XTEN-AV enhances the overall quality of your projects and minimizes costly rework.
Adherence to AVIXA Design Standards and Guidelines
XTEN-AV’s Ceiling Speaker Layout and Calculator incorporates AVIXA design standards and guidelines, guaranteeing that your projects meet the industry’s recognized benchmarks. This not only enhances the performance and functionality of your AV systems but also instils confidence in your clients, reinforcing your reputation as a professional AV integrator.
Cost-Effective Solution
XTEN-AV offers a range of other tools and resources that can further support your AV integration needs. By leveraging XTEN-AV’s economical solutions, you can optimize your budget while still benefiting from high-quality design tools.
AV Design Mastery + Winning Proposals = 10x Productivity!
- Automatic Cable Labeling & Styling
- 100+ Free Proposal Templates
- Upload & Create Floor Plans
- 1.5M Products from 5200 Brands
- AI-powered ‘Search Sense'
- Legally Binding Digital Signatures
No Credit Card Required
Steps To Use XTEN-AV’s Ceiling Speaker Placement Calculator
By ensuring that your speakers are positioned in the ideal location for the best sound quality, the XTEN-AV Ceiling Speaker Placement Calculator may help you save time and money. Furthermore, it can assist you in avoiding frequent blunders like positioning speakers too near corners or walls, which can lead to distortion and inconsistent sound. We have explained below how to use our tool optimally.
Select Brand
The first step in using the XTEN-AV Ceiling Speaker Placement Calculator is to select the brand of your ceiling speakers from the drop-down menu. XTEN-AV supports a wide range of popular brands, including JBL, Klipsch, Sonos, and Yamaha, among others.
Model Number
You will then have to input the model number of your ceiling speakers after choosing your brand. The calculator will be able to calculate your speakers’ precise technical parameters, including their frequency response and power handling capabilities, with the help of this information, which is crucial.
Room Dimensions
The next thing is your room size. Your room’s length, breadth, and height should be specified in feet or meters. Additionally, you may indicate if your room is rectangular or irregular, which may have an impact on where your speakers are placed.
Coverage Pattern
The final step is to select the coverage pattern for your speakers. This refers to the area of the room that your speakers will cover with sound. XTEN-AV offers 3 types of coverage patterns, including edge-to-edge, partial coverage, and edge-to-center. The coverage pattern you select will depend on the layout of your room and your specific audio needs.
Once you have entered all of the necessary information, the XTEN-AV Ceiling Speaker Placement Calculator will generate a 3D diagram that shows you exactly where to install your speakers for optimal sound quality. The diagram includes detailed information such as the height and angle of each speaker, as well as the recommended distance between speakers and walls.
Maximize AV Excellence with XTEN-AV's Ceiling Speaker Calculator
Did you know how XTEN-AV’s cutting-edge Ceiling Speaker Placement Calculator helps you achieve precision? Designed in strict accordance with AVIXA guidelines, this tool revolutionizes the integration process for Audio-Visual professionals.
Before delving into the details, let us first introduce you to the formula we use in our ceiling speaker calculator:
Loudspeaker Coverage Pattern (Ceiling Mounted)
𝐷 = 2 ∗ (𝐻 − ℎ) ∗ tan (𝐶∠2)
Where D is the diameter of coverage circle at ear height
H is overall ceiling height
h is the height of the listener’s ears (48 inches)
C∠ is off-axis coverage angle of polar pattern
Loudspeaker Spacing (Ceiling Mounted)
𝐷 = 2 ∗ 𝑟 (Edge-to-edge)
𝐷 = 𝑟 ∗ √2 (Minimum overlap)
𝐷 = 𝑟 (Center-to-center)
Where D is the distance between loudspeakers
r is the radius of loudspeaker coverage circle
Unparalleled Accuracy
Our calculator employs a scientifically grounded formula, ensuring optimal loudspeaker coverage pattern based on crucial factors: overall ceiling height (H), listener’s ear height (h), and off-axis coverage angle (C∠). This guarantees a seamless auditory experience for every individual in the space.
Simplify Installation with Smart Spacing
Leveraging AVIXA standards, XTEN-AV’s tool streamlines loudspeaker placement. From edge-to-edge, minimum overlap, to center-to-center spacing, the calculator provides flexible options tailored to specific project needs. This empowers integrators to make informed decisions, saving valuable time and resources.
Boost Efficiency
By utilizing our Ceiling Speaker Placement Calculator, AV system integrators can effortlessly enhance sound distribution and coverage. Achieve optimal results that adhere to industry best practices, all while significantly reducing the guesswork associated with traditional placement methods.
Experience unparalleled precision and efficiency with XTEN-AV’s Calculator—where AV excellence meets innovation. Elevate your installations to new heights, setting a new standard in audiovisual integration.
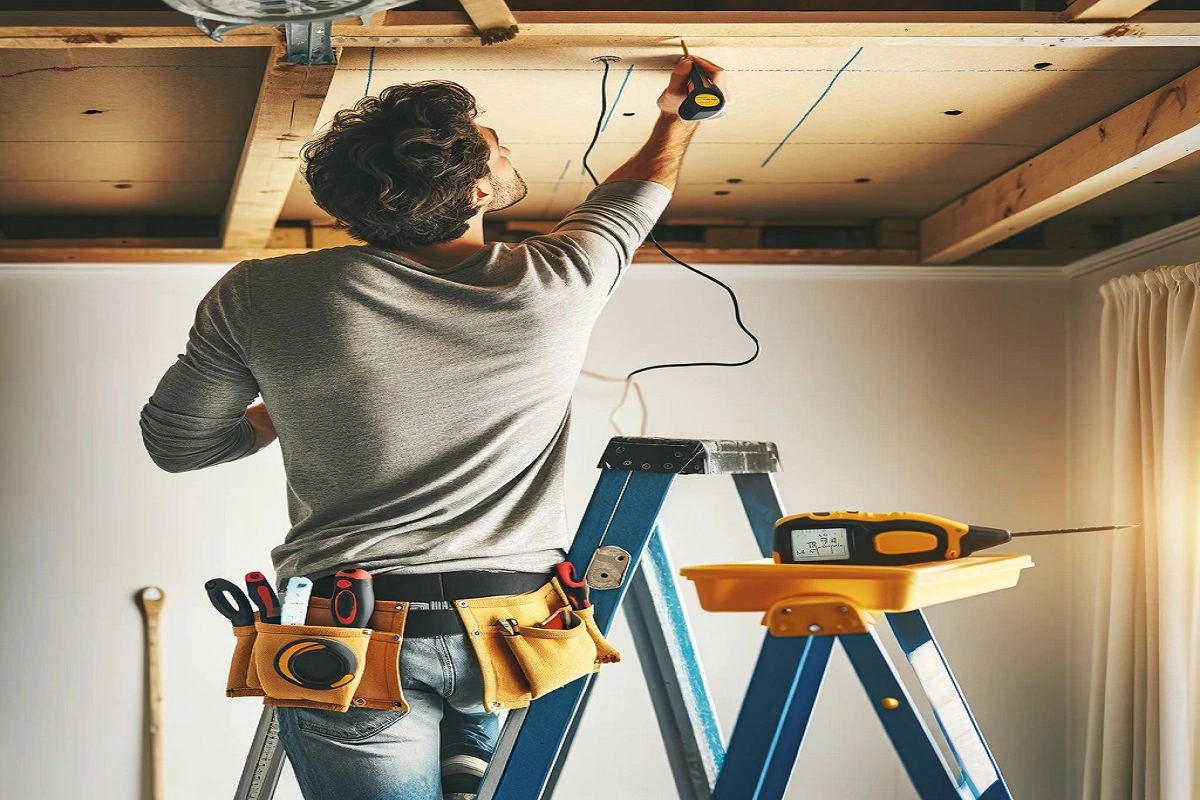
9 Steps to Install Ceiling Speaker
Do you find installing ceiling speakers a tough job? Here is a full step-by-step guide to help you install ceiling speakers without messing it up. However, you can get help from professionals but again, DIYs are always the best choice.
Step 1: Gather Your Tools and Materials
First and foremost, let’s ensure that you have all the tools. Typically, you’ll need a stud finder, a pencil, a drywall saw measuring tape, a screwdriver, speaker wires, and of course your ceiling speakers.
Step 2: Choose the Right Location
Choose the location for installing your ceiling speakers by taking into account factors such as the room’s design, seating arrangements, and acoustic properties. Ensure that there are no obstacles, like pipes or wires, in the selected area.
Step 3: Locate the Ceiling Joists
Start by getting your stud finder and finding the ceiling joists. It’s important to locate them to ensure an installation of the in-ceiling speakers. Use your pencil to mark the spots where the joists are located.
Step 4: Plan Speaker Placement
After you have identified the spot. Indicated the joists carefully decide on the in-ceiling surround sound speaker placement of each speaker. Strive for an arrangement to ensure an audio experience, across the entire room.
Step 5: Cut Speaker Openings
Using the measurements and marked spots as a guide, carefully use a drywall saw to create openings for your ceiling speakers. Take your time. Be cautious to avoid any accidents or damage to the existing wiring.
Step 6: Connect the Wiring
Connect your source to the speaker locations by running the speaker wires. Remember to leave some wire so that you can conveniently connect ceiling speakers.
Step 7: Mount the Speakers
Now it’s time for the thrilling step of mounting speakers on the ceiling. Just follow the instructions provided by the manufacturer for your model. Typically, this entails using screws to attach the speakers to the joists, in the ceiling.
Step 8: Connect the Speakers
Make sure to connect the speaker wires to the terminals, on each speaker. It’s important to have a secure connection, so double-check the polarity to prevent any problems with the phase.
Step 9: Test and Fine-Tune
Now you’ve completed the process of installing ceiling speakers. Before you start celebrating it’s an idea to give your new ceiling speakers a trial run. Play some of your songs or even a movie soundtrack to make sure everything sounds just right. If needed, you can make adjustments to the positioning or settings of the speakers to achieve the possible audio quality.
Best Practices For Installing Ceiling Speakers
Ceiling speakers are designed to provide excellent sound quality without covering up much of your space. However, it also becomes important that you ensure they are installed properly so you get the best possible audio experience. We recommend you follow the list below while getting your ceiling speakers installed.
Proper Wiring and Insulation
Ceiling speaker wiring and insulation are two very important components of getting high-quality sound from your speakers. It would be better if you use speaker wires of the highest caliber and ensure that the thickness is efficient to handle the output of your speakers. Insulating the cables will also help you reduce sound loss and interference from other electrical equipment.
Correct Mounting and Sealing
To optimally enjoy the benefits of your speakers it’s important to correctly mount and seal them. The speakers should be fastened securely to the ceiling and there should be no gaps or spaces between the speaker and ceiling. Using an acoustic sealant will ensure better sound quality by preventing any kind of leakage.
Strategic Placement
It’s not easy to calculate the exact placement of your speakers, there are many factors that need to be considered. Strategic placement. You can always rely on the XTEN-AV ceiling speaker layout tool, to determine the best placement for your speakers based on the size of the room.
Calibration
As soon as your ceiling speakers are installed the first thing you need to do is calibrate them properly to ensure optimal performance of your speakers. You can use a sound meter to measure and adjust the volume levels of each speaker, however, it can be done later also but it’s better to check it now.
Choose High-Quality Speakers
Finally, do your research and get your hands on the most high-quality speakers in your budget. This is a great way to get excellent sound quality from your ceiling speakers. We would suggest that you invest in speakers with a wide frequency response range and a high power handling capacity.
AV Design Mastery + Winning Proposals = 10x Productivity!
- Automatic Cable Labeling & Styling
- 100+ Free Proposal Templates
- Upload & Create Floor Plans
- 1.5M Products from 5200 Brands
- AI-powered ‘Search Sense'
- Legally Binding Digital Signatures
No Credit Card Required
Conclusion
Installing ceiling speakers can be a great addition to your home entertainment system, but it’s important to avoid common mistakes that can negatively impact sound quality. By following the tips we’ve outlined, you can optimize your speaker placement for the best listening experience possible.
Remember to use a ceiling speaker placement calculator offered by XTEN-AV, to determine the best placement for your speakers based on your room’s size and layout. By taking the right steps, you can avoid the common mistakes people make when installing ceiling speakers and ensure that your entertainment system provides the best possible listening experience.
So why not try out XTEN-AV’s own ceiling speaker placement calculator and take the first step toward optimizing your sound system? With the right placement and setup, you can enjoy your favorite music, movies, and games like never before.
Frequently Asked Questions
If it’s a small room around 3×3 meters then you will need only one pair of speakers, however, if the room size exceeds 5X5 meters then you will require two sets of ceiling speakers. Note that ceiling speakers are mostly available in pairs only.
Speakers are supposed to be installed at least 18 inches away from the wall. And if we talk about the distance between two speakers then try to keep them as far as you’d want to keep normal speakers. Ceiling speakers might seem small but are quite powerful.
Yes, you can use the speaker for any kind of room, just mention the dimensions of the room and your speaker requirement. Our tool will instantly design your layout without any hassle. Get a 3D layout that is ready to use, however, if you’re an AV integrator then you may make changes accordingly.
To determine the right size of ceiling speakers for your room, consider the room size, ceiling height, and speaker power handling. For small rooms, 6-7 inch speakers may be sufficient, while larger rooms may require 8-10 inch speakers. Additionally, higher ceilings may require more powerful speakers.
Yes, ceiling speakers typically need an amplifier. Here’s why:
- Power Requirements: Ceiling speakers are passive, meaning they don’t have built-in amplifiers to power them. They require an external source of power, which the amplifier provides.
- Signal Boost: The audio signal from your source (like a TV, computer, or music player) is usually too weak to drive speakers directly. The amplifier boosts this signal to a level suitable for driving the speakers.
- Sound Quality: An amplifier enhances the overall sound quality, providing clearer and more dynamic audio. This makes a significant difference, especially in larger spaces or when you have multiple speakers.
Choosing the right amplifier involves considering several factors:
Power Output: Match the amplifier’s power output (measured in watts per channel) with the power handling capacity of your ceiling speakers. If your speakers are rated for 50 watts, an amplifier that delivers 40-60 watts per channel would be appropriate.
Impedance Matching: Ensure the amplifier’s impedance matches that of your speakers. Most ceiling speakers have an impedance of 8 ohms, so your amplifier should be able to handle that.
Number of Channels: Determine how many channels you need. A stereo amplifier is suitable for a two-speaker setup, but if you’re setting up a home theater or multi-room audio system, you’ll need a multi-channel amplifier.
Features: Look for additional features that might be important to you, such as Bluetooth connectivity, Wi-Fi streaming, multiple input sources, and remote control capabilities.
Brand and Quality: Invest in a reputable brand known for high-quality audio equipment. Reading reviews and expert recommendations can be helpful.
Connecting ceiling speakers to an amplifier involves a few straightforward steps:
Turn Off the Equipment: Always start by turning off both the amplifier and the source device to avoid any electrical issues.
Wire Preparation: Use speaker wire that matches your setup (typically 16-gauge wire for shorter runs and 14-gauge for longer runs). Strip about half an inch of insulation from the ends of the wires.
Connect to Speakers: Attach the speaker wire to the terminals on the back of the ceiling speakers. Usually, there are spring-loaded or screw-type terminals. Ensure the positive (red) and negative (black) wires match the corresponding terminals.
Run the Wires: Route the speaker wires through your ceiling or walls to the location of the amplifier. Make sure the wires are properly secured and hidden for a neat installation.
Connect to Amplifier: Attach the other ends of the speaker wires to the appropriate terminals on the amplifier. Again, ensure the polarity matches.
Power On and Test: Turn on the amplifier and your source device. Play some audio and check each speaker to ensure they’re working correctly.
The placement of your amplifier is crucial for both functionality and convenience:
Accessibility: Place the amplifier in an accessible location so you can easily reach the controls, inputs, and outputs. This could be in your living room, home theater, or a dedicated audio equipment rack.
Ventilation: Amplifiers generate heat, so ensure there is adequate ventilation to prevent overheating. Avoid placing it in enclosed spaces without proper airflow.
Proximity to Source and Speakers: Ideally, place the amplifier close to your audio source and the speakers to minimize long cable runs, which can degrade signal quality and increase the chances of interference.
Aesthetic Considerations: Consider the overall look of your space. Many people prefer to hide their amplifiers in cabinets or equipment racks that blend with their decor.
Noise Reduction: If your amplifier has cooling fans or other noise-producing elements, placing it in a separate room or cabinet with soundproofing might be beneficial to avoid any disturbance during quiet listening moments.