








Conference Room AV Setup Made Easy: A Step-by-Step Guide from Start to Finish
Poorly designed conference rooms disrupt communication, create frustration, increase meeting delays and make it harder for teams to collaborate effectively. In hybrid environments, these challenges are often amplified because room participants are more likely to be affected by poor audio, limited camera coverage or difficult room controls.
As per Future Market Insights, the conference room solution market is expected to expand from USD 2.1 billion in 2026 to USD 8.5 billion by 2036. The market is anticipated to register a 12.3% CAGR from 2026 through 2036.
To address these challenges, organizations are investing in a well-designed conference room AV setup. The system must support clear communication between in-room and remote participants, reliable content sharing and simple meeting control. Achieving this requires more than selecting a display and camera. Room dimensions, seating, acoustics, equipment coverage, signal flow, cabling and system testing must all be planned as one connected system.
This guide explains how to plan the AV layout, select the right conference room equipment, map signal flow and cable routes, optimize audio and video quality and test the complete system for reliable meeting performance.
The all-in-one solution for your AV needs
Transform your audio-visual experience with XTEN-AV.
No Credit Card required
Key Takeaways
- A reliable conference room AV setup begins with seating capacity, room dimensions, meeting objectives, user needs and not just equipment selection.
- Signal flow mapping and structured conference room cable management make installation, maintenance and troubleshooting a hassle-free procedure.
- Proper AV equipment should provide clear camera sightlines, consistent microphone pickup, and even speaker coverage from every seating position.
- Acoustic treatment, controlled lighting and system calibration play a vital role in affecting speech clarity, video quality and meeting experience.
- Displays, cameras, microphones and speakers should be selected on the basis of viewing distance, coverage, room acoustics and the number of people.
- X-DRAW helps AV professionals create floor plans, automate conference room signal flow diagrams, select products and generate BOMs.
Why do you need an AV setup for your conference room meeting?
AV setup for your conference hall is necessary for clear communication, content sharing and effective collaboration between in-person, remote teams, customers and partners worldwide. No matter a huddle room or a large meeting room, the right conference room audio visual equipment for the conference rooms ensures a proper view and audio reception for all participants.
Today’s workplace is no longer defined by a single space or platform-It’s an ecosystem.
– Jenn Heinold, Senior Vice President, Expositions, Americas, AVIXA.
This shift towards a connected workplace explains that a conference room AV system must function as part of a larger ecosystem, integrating conference room audio visual solutions and control systems into a unified experience.
Workplace expectations have changed dramatically, in-office professionals routinely collaborate with distributed teams, international clients and field operations. Meeting equality, which is defined as a principle that every participant, whether available in the boardroom or joining from a home office, has an identical visual and auditory seat at the table. It is the primary metric for modern enterprise spaces.
High-quality displays, distributed microphones, a dedicated speaker system, and centralized AV controls are essential for modern audio-video conferencing. They ensure effective communication and collaboration in a conference room setting.
By selecting the right video conference room setup equipment and integrating it properly, businesses can support hybrid meetings, training sessions and collaborative discussions with consistent performance.
Step-by-Step Guide to Planning Your Conference Room AV Setup
Planning a conference room AV setup starts with having a complete understanding of the room, meeting requirements and user experience before selecting any equipment. Following these steps creates a conference room audio visual setup that allows every participant to see the content clearly, hear discussions properly and join video meetings without unnecessary technical delays.
Define the Room and Meeting Requirements
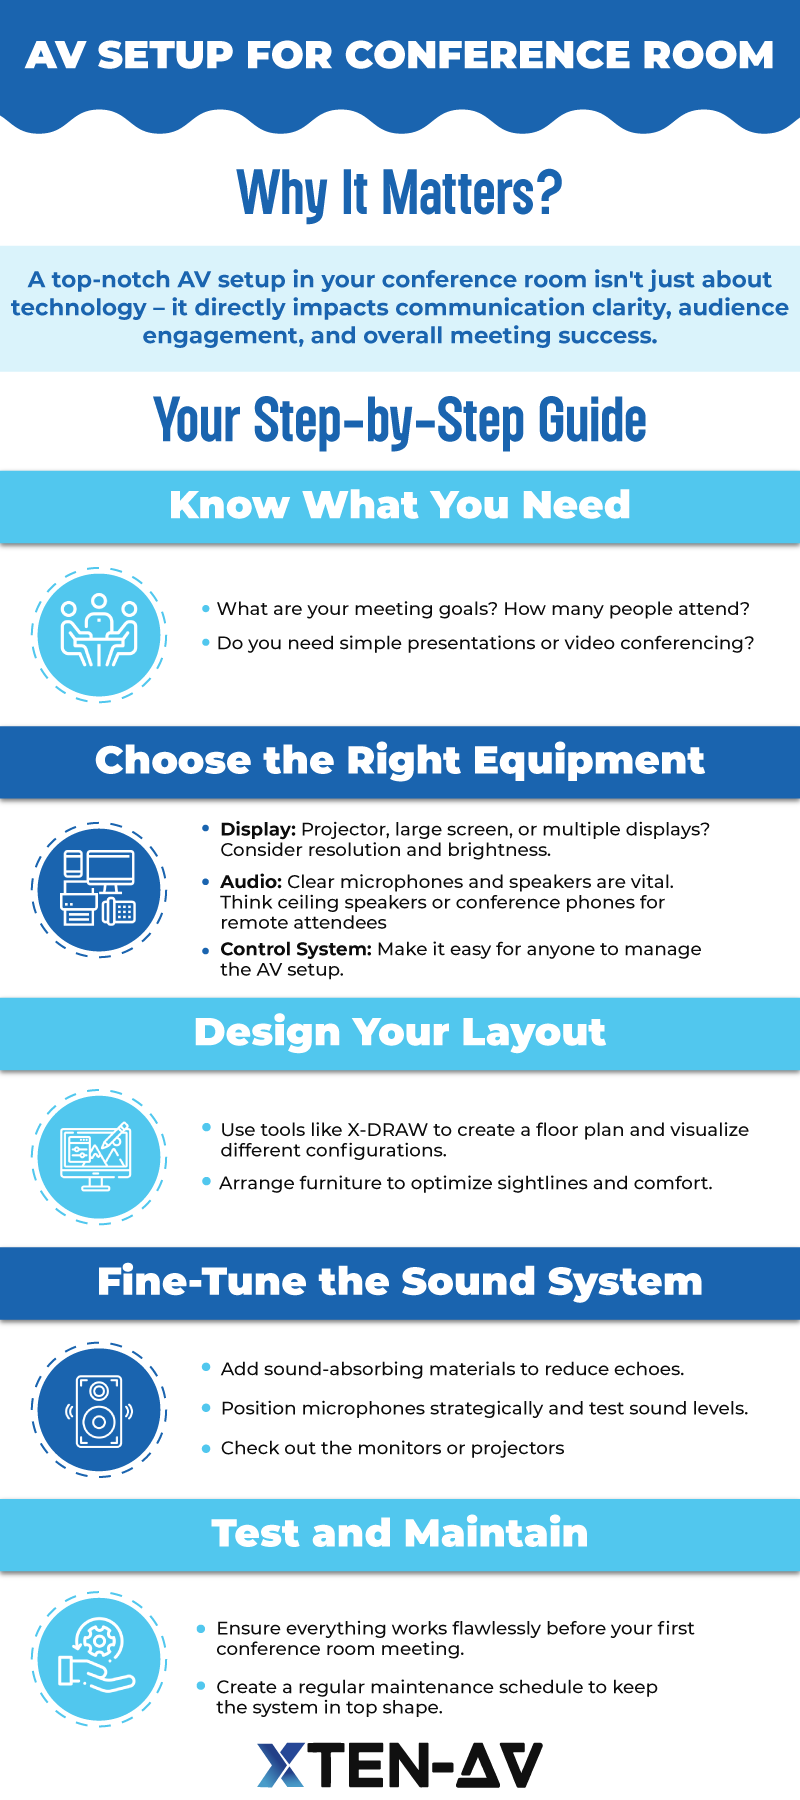
Start by documenting how the room will be used. An AV setup for a conference hall should be designed around the objectives of your meetings and your typical audience size. Determine the tools required and the type of equipment to use.
Consider:
- Table shape and seating configuration
- Room dimensions and seating capacity
- Presentations, training, brainstorming and video calls
- Wired, wireless or BYOD connectivity
- Accessibility and ease of use
- Future room expansion
Select the Right Conference Room Audio Visual Equipment
Once the requirements are clear, select equipment that provides optimum coverage for the complete room.
Display: Choose between a large format display, projector or multiple screens based on the room layout and content being presented.
Also consider:
- Screen size
- Mounting height
- Ambient light and glare
- Single-screen or dual screen requirements
- Viewing distance
Audio: Poor speech intelligibility can make it difficult for participants to follow discussions, even when the video systems perform properly. Hence, for effective communication investing in good microphones and speakers is a significant factor to consider.
Select microphones and speakers that provide clear, consistent coverage across every seating position. Small rooms may use an all-in-one conference speakerphone, while larger spaces may require tabletop or ceiling microphones with distributed ceiling or wall-mounted speakers. The choice should depend on room size, seating layout, acoustics and the number of participants.
Camera: When it comes to selecting a camera for your conference room audio visual setup, you have to make sure that your chosen camera should capture every seating position without showing excessive empty space. An optimal conference room camera should offer minimum 4k resolution and a wide field of view (90 degrees minimum) to capture everyone at the table. Larger rooms may need pan-tilt-zoom capabilities to cover participants.
Control System: A conference room audio visual (av) control system connects displays, cameras, audio, lighting and presentation sources through one easy-to-use interface. Users should be able to start a meeting, share content, adjust volume and change sources without navigating multiple remotes or applications.
Map the Signal Flow and Cable Routes
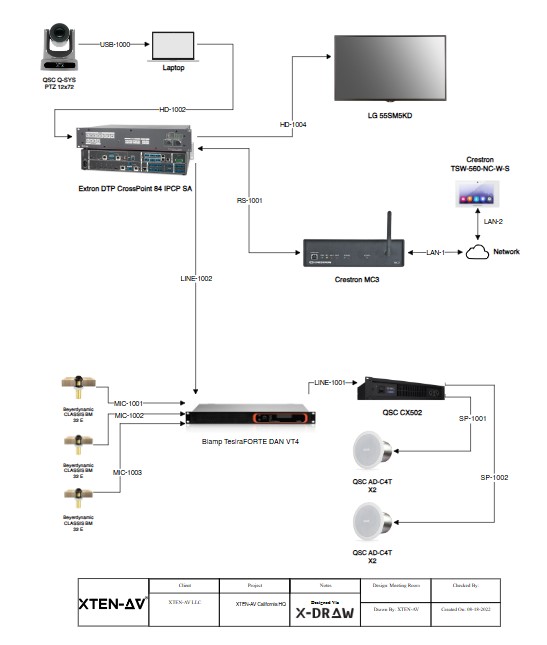
Successful conference room AV integration depends on a clearly mapped signal flow and planned cable routes. Signal flow shows how audio, video, control and network data move between connected devices. While, cable-route planning defines the physical pathways that support those connections. Documenting both before installation minimizes double work and gives AV installers a clear reference for cable type, origin, destination and routing.
Create the Conference Room AV Design and Layout
Determine your AV conference room’s optimal layout and design. Here’s how you can do it:
- Create a detailed floor plan: Map out room dimensions, tables, seating and structural elements. Upload an existing plan or create one from scratch using an AV design tool such as X-DRAW.
- Plan the seating configuration: Arrange tables and chairs to maximize visibility without obstruction and ensure a comfortable experience for all participants.
- Experiment with Conference Room Configurations: Try out different displays, speakers, and camera placements to find the most suitable conference room configuration for the room size and meeting purpose
- Visualize the final setup: Use conference room setup diagram to review equipment placement, sightlines, coverage and installation requirements before deployment. These diagrams also help designers and conference room AV installers understand the approved layout.
Optimize Conference Room Audio and Video Quality
Optimizing a conference room audio visual setup needs the right equipment placement, acoustic treatment, lighting and system calibration. All the components need to be tested from every seating position so that both in-room and remote participants can have clear communication.
Improve Sound Quality: AV teams should use Conference room acoustic panels or sound-absorbing materials to eliminate echo and reverberation. Microphone should be placed close enough to capture speech clarity and arrange speakers for even coverage. It is important to note that room acoustics and microphone placement have a direct impact on speech intelligibility in a conference room sound system.
Optimize Display Placement: Displays should be mounted where shared content remains visible from every seating position. Avoid direct sunlight, reflections and glare that can make readability difficult.
Calibrate audio and display settings. : Adjust microphone levels, speaker equalization, volume controls, display setting and camera framing for the room. With regular calibration, you can make sure that every equipment is in good condition that ensures efficient performance.
Testing & Maintenance of Equipment for Optimal Performance
After installation, test all audio visual equipment to ensure that the conference hall is ready for use. Check the video displays, microphones, speakers, presentation sources and control systems to confirm each component works as intended. A regular conference room AV maintenance schedule can also help prevent technical issues, reduce downtime and keep the system performing reliably over time.

What Common Conference Meeting Room AV Setup Mistakes Should You Avoid?
Even high-quality conference room AV design can perform poorly if the conference room sound system, display, layout, audio video equipment, connectivity and user experience are not properly planned.
Avoiding the listed below mistakes can minimize installation changes, meeting disruptions and ongoing support issues.
Common Mistakes | Why it Creates Problems | How to Avoid It |
Finalizing a display without calculating viewing distance | A screen that is too small makes minute details difficult to read, while a bigger display doesn’t mean it is better. An oversized display can make pixels more noticeable, require excessive eye or head movement and create uncomfortable viewing angles for participants seated closest to the screen. | Plan the conference room monitor setup around room dimensions, content type, resolution and the farthest seating position. |
Poor microphone placement | When you use one microphone for a large table, people far away will sound soft or echo. | Map microphone coverage across every seating position. Use tabletop, ceiling or distributed microphones where necessary. |
Placing the camera without considering sightlines | A camera mounted too high, creates a downward view. Placing them too low creates an unflattering upward angle. Off-centers usually cut off people seated at the front. | Cameras need to be mounted at seated eye level. A wide-angle lens or an AI auto-framing camera to capture every seat. |
Overlooking Acoustics and lighting | Bare walls and glass bounce sound waves around. This creates an echo. Backlighting from a bright window can create dark shadows of participants. | Room evaluation should be done at different times of day. Test the setup with all window blinds open as well as closed. This will help in finding the ideal baseline lighting configuration. |
Leaving cables unlabelled or inaccessible | Poor conference room cable management makes maintenance, equipment replacement, AV troubleshooting harder. | Document cable sources and destinations. Apply consistent labels and provide accessible pathways with capacity for future connections. |
Making room controls complicated | Numerous remotes, applications and control interfaces lead to errors | Use a conference room control system with clear functions for starting meetings, sharing content and adjusting audio to name a few. |
How does X-DRAW Simplifies Conference Room Audio Visual (AV) Design and Integration?
X-DRAW simplifies conference room AV design by helping AV teams plan room layouts, choose the right equipment, create signal flow diagrams and generate project documentation within one platform. As a cloud-based drawing and diagramming platform, it reduces design inconsistencies while giving designers, engineers and integrators a clearer view of the proposed conference room system before installation.
Let’s understand the capabilities of X-DRAW:
Upload and Create Floor Plans
X-DRAW allows AV teams to upload or create new floor plans for their conference rooms. AV designers can add room dimensions, tables, seating arrangements and AV devices to visualize the proposed setup. Existing AutoCAD or Visio floor plans can also be uploaded and customized without recreating the complete room layout.
Generate Detailed Line Schematic
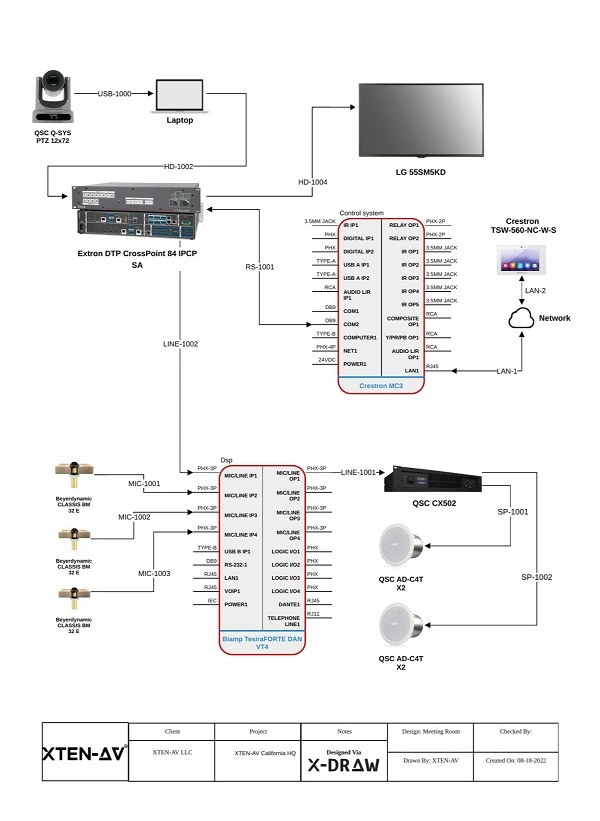
Automatically generates detailed line schematics from the X-DRAW design. These drawings show device-to-device connections, signal paths and cable routing between displays, cameras, microphones, speakers, control systems and network equipment in a clear schematic format. This gives AV engineers and installers a clear technical reference for system integration and on-site installation.

Automate Signal Flow Diagram
Instead of drawing every device connection manually, system engineers can use X-DRAW to generate signal flow diagrams from device connections. This will show how audio, video, control and network signals travel between sources, cameras, microphones, displays, speakers and other conference room components.
Access a Library of 1.5M Products from 5200+ Brands
X-DRAW provides access to a searchable library of 1.5 million products from 5200+ leading brands. This means AV designers can select displays, cameras, speakers, microphones and control devices that fit the room requirements and intended conference room experience.
Generate Bill of Materials
X-DRAW generates a Bill of Materials directly from the completed drawing. The BOM includes equipment quantities, model details, part numbers and available pricing information. This helps pre-sales teams, procurement professionals and project managers save hours of extra work, which is required to create BOM manually from completed drawings.

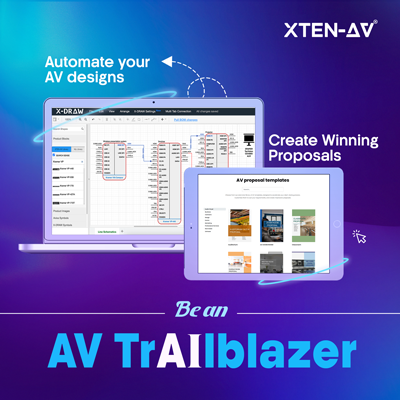
AV Design Mastery + Winning Proposals = 10x Productivity!
- Automatic Cable Labeling & Styling
- 100+ Free Proposal Templates
- Upload & Create Floor Plans
- 1.5M Products from 5200 Brands
- AI-powered ‘Search Sense'
- Legally Binding Digital Signatures
Ready to Transform Your Conference Meetings
A reliable conference room AV setup is not just about selecting displays, cameras, microphones and speakers. It includes accurate room planning, clear signal flow and reliable connectivity that works together as one integrated system.
With X-DRAW by XTEN-AV, this process can become simpler. AV teams can start with conference room setup diagrams templates, customize room layouts and visualize equipment placement. Additionally, automate signal flow diagrams and generate BOMs from the completed drawings.
Now, it’s time to take action. Equip your AV team to move from initial room planning to accurate design with greater consistency, clarity and control.
FAQs
A conference room AV setup typically includes a display, microphones, speakers, camera and a video conferencing system. It should also include a control interface, suitable cables and connectivity to support smooth presentations and hybrid meetings.
Position the camera at eye level. Ensure good lighting and use high-quality conference room speakers and microphones. Test the video conferencing software beforehand and have a stable internet connection.
AV setup (audio visual setup) is the conference room configuration and connection of audio and visual equipment to create a system for presentations or communication. This typically includes speakers, microphones, displays, projectors, and other related components.
The best audio setup includes a dedicated microphone (e.g., USB or lapel mic) to cut background noise and echo. You also need high-quality speakers for clear sound. And, test audio settings before the meeting.